


Long before the dawn of digital music, folks employed the power of the electric color organ (aka “light organ”) to add some synced visuals to their hi-fi experience. Schematics for building such a beast based on AC power and incandescent bulbs can be be found fairly easily on the web, but plans for comparable LED-based designs seem a bit harder to come by.
Adapted from Aaron Cake’s 3 Channel Spectrum Analyzer, I built my own analog LED Color Organ to enhance the aural experience. The circuit uses 4 operational amplifiers plus ultra-bright 5mm LEDs to respond visually for bass, mid, and treble frequencies. A parts bundle for building your own incarnation of the project is now available from Jameco.
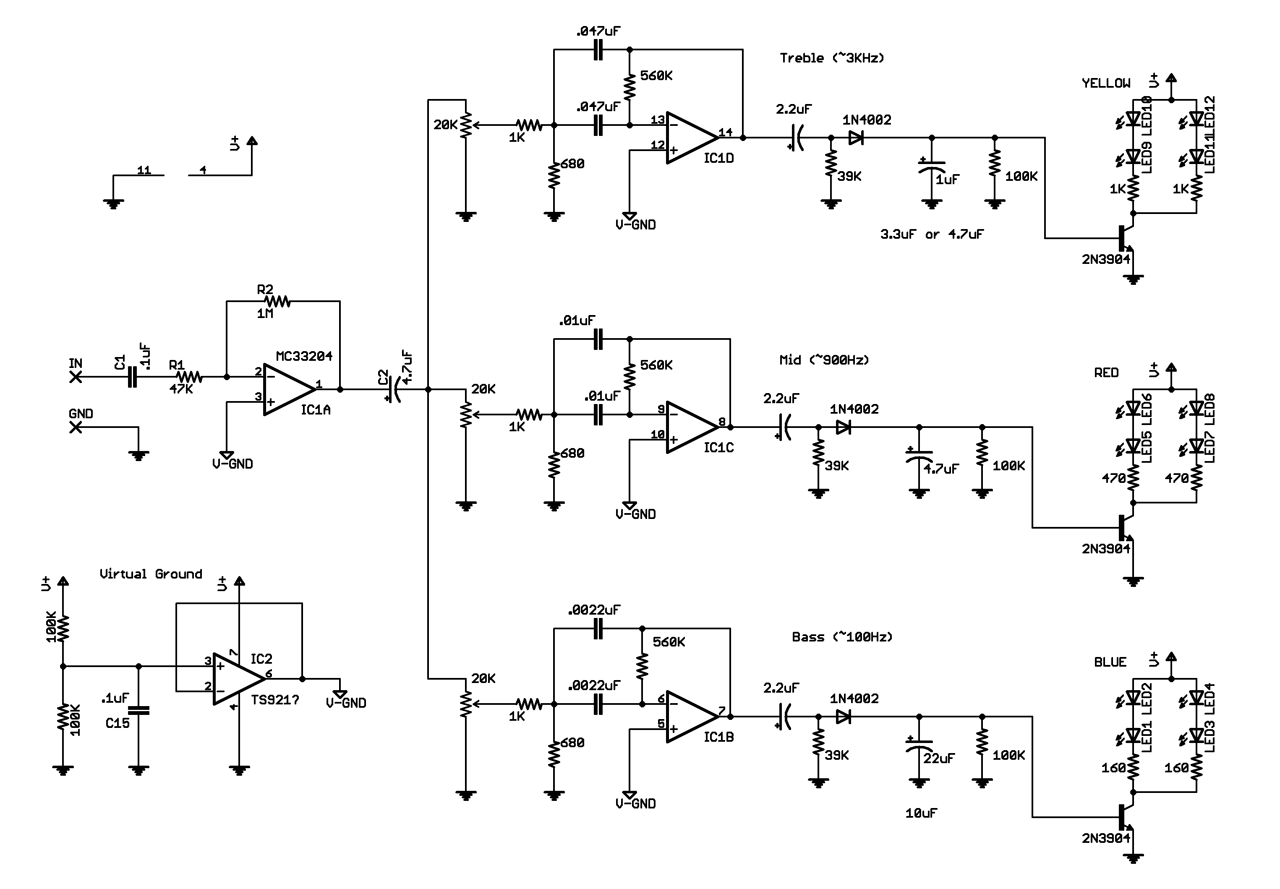
Schematic updated 11/1/10, Larger size available here
In order to simplify the construction process, I drew up and printed a label specifying the pinout for quad op amp ICs. Those interested in printing their own can download the design here.

I’ll likely continue tweaking the design as I continue the unusually groovy process of testing this thing. I predict a second channel plus somewhat more dramatic display option may be in my future ;)
Subscribe to the MAKE Podcast in iTunes, download the m4v video directly,
or watch it on YouTube and Vimeo.
150 thoughts on “Circuit Skills: LED Color Organ, sponsored by Jameco Electronics”
Comments are closed.
ADVERTISEMENT
Join Make: Community Today


Wow this is awesome. I’m an electronics student and I really want to get into DIY electronics in my spare time, and this feels like a good first project. Just a few questions though, if someone could help:
1. What is that virtual ground bit doing
2. Where does it go in the circuit? i.e how does the other stuff connect to it.
3. What do the numbers around the op-amps mean? Is it possible to add more to have an extra set of 4 LEDS (more frequency ranges)?
Lol, just noticing some american/uk differences (or am I imagining them) Soder/Solder, Squiggly line for resistors/rectangles. NO too fussed but is there a components list? As I’m gonna be hunting them down in maplins.
Sorry for being an epic noob (but hopefully not for long), Thankful for any help.
Scott’s explanation of virtual ground (see below) is well put – thanks, Scott!
I believe the numbers around the op amps you speak of are the pin numbers (these assist in translating the schematic to an actual circuit board)
I’ll add the parts list here soon – thnx for the reminder!
And for the record my dictionary says –
solder |ˈsädər|
;-)
i am unable to fin mc33204p IC in pakistan . so tell me any other IC which can do the same work or canbe used instead of this ??? :((((((
I don’t see why you can’t use a LM324, available at radioshack. you can probably use most quad op amps
I have used an LM324 with no problems at all. I also skipped using the virtual ground, and so far I haven’t noticed any odd behavior.
hey can u clarify the that gnd except the v-gnd are the same,
the one near the input and the battery gnd are the same ?
please also carify that v+ represents what in ic2
1. The circuit operates from a single sided supply, but the audio goes positive and negative. The voltage divider provides a voltage halfway between V+ and GND, but it’s high impedance. The op-amp buffer after the divider gives you a low-impedance ground.
2. All of the VGnds are connected together.
3. You can design and add as many filters as you like.
4. Numbers around the op-amps? Do you mean the component values?
Hi, just a quick question, why is the audio input signal connected to the ablsolute gnd instead of the virtual gnd if all the op amps are connected to the virtual gnd?
thanks
How many volts does the circuit need?
I was using a 12V 500mA supply in the vid.
wow … amazing what you can forget to put on a schematic, eh?
Lol, I know the feeling. I just want to make the circuit wearable. Thanks!
Realy cool project.
I’d like to integrate this into a project I’m working on, so a parts list would be nice.
In the video at 4:57 there are changeable resistors, where are they in the schematics?
Mathias
the potentiometers are located before the input of each bandpass filter, labeled with a value of 20K
Hey Collin,
I’m a long time Make Blog reader. I have got to say that this type of post adds so much to the community. I’m still learning electronics and the detailed videos of putting circuits together is exactly what I need to advance my skills.
Thanks for the Circuit Skills series, hope you keep it going for us circuit newbs.
I’ve done a quick and dirty parts list. Maybe someone would like to use it. But I’m not 100% shure about IC2 cause it’s named “TS921?” in the scheme. I think TS921IN should work for this.
Partslist LED Organ Scheme:
Capaciators:
2x .1uF
1x 4.7uF
3x .047uF
2x .01uF
2x .0022uF
3x 2.2uF
1x 1uF
1x 4.7uF
1x 22uF
optional:
1x 3.3uF
1x 4.7uF
1x 10uF
Resistors:
1x 47K
1x 1M
5x 1K
3x 560K
3x 680K
3x 39K
5x 100K
2x 470
2x 160
3x 20K (potentiometer)
Diodes:
3x 1N4002
Transistors:
3x 2N3904
ICs:
4x MC33204PG
1x TS921IN
LEDs
4x red
4x blue
4x green
Other
1x perfboard
1x DC plug
1x stereo plug
??x cables
sorry I got it wrong. You only need 1 MC33204PG !
TS921? = MC34072P
MC34072P is a dual operational amplifier. It should work fine for this and will leave you with an extra op amp for use with a second channel of audio.
i m unable to find this IC in pakistan mc33204p tell me which i IC can be used instead of this . tell me 2 or 3 ok
I’m considering making a SMT version of this and in stereo to make it fit inside my laptop, and put the LED’s around the trim bezel of the screen!
On Aaron Cake’s 3 Channel Spectrum Analyzer he’s using line level inputs, I was wondering if you have changed this to speaker level inputs or if the circuit is still designed with line level input?
Hello Masters of Circuitry!
I am very interested in this Color Organ but have one question about it. What would I have to do to run more LEDs with the same ICs? I’m hoping to run up to 50 for each color (I know that’s a little much, maybe 25 with 2 kits?).
Also, I would like to have a larger frequency difference between 3 op-amps. How can I change that?
just build a separate light board with its own power source and connect via “header pins”
the more LED’s you add to the onboard circuit will be too heavy of a draw for the op amps out puts
Like using speakers on an amplifier that are rated too high for the amplifier. will either be weak, or act as a short on the amplifier out put and burn it up, or both.
Those header pins your referring to are the same ones in the video correct? I was wondering what those were for. Do I need to run any LEDs in the circuit at all or do I go straight to the header pins?
This is awesome. I’ve been wanting to build something like this for a while, but haven’t gotten to it yet. Now I absolutely will.
Collin, could you please post some high-res photos of the front/back of the perf board? I’m looking at stills from the video but I don’t understand how you managed to route all of the connections so smoothly. In many cases the output of a pin or a connection magically gets across to the other side of the board.
Speaking of which, I’d love to see a more detailed/slower overview of laying out parts on a perf board and routing the connections. I know you did perf boards in a Circuit Skills episode, but it would be nice to see more. I’m sure it’s something you learn with experience, but it’s very frightening at first.
In either case, awesome work! I’ve been loving every one and plan to get a few of the kits in the coming weeks (Birthday, woot!).
This circuit is so simple it’s amazing how fussy it is. PSPICE hated the virtual ground though.
Tips for people working on this project:
1)build it in stages, it makes it easier to debug if it doesn’t work.I started with verifying my virtual ground.
2)Make sure to include the biasing capacitor on the inverter. It’s there to filter out any DC in your signal, and the virtual ground then gives you your offset half way between your rails. Even with my function generator with a 0 offset, it was still saturating at 12V until I added that capacitor (C1).
3)If you use the opamp Jameco has listed for the virtual ground, do NOT use the pins listed in the schematic. I was lazy and just followed the pins listed, which is for a single opamp, jameco kit gives you a dual so even though it says pins 7 is the upper power rail, it’s actually the second output and it fried my IC.
Video came out with amazing timing though, I’m using this as my final project for my microelectronics lab final after I make a few tweaks. Anyone have good suggestions for songs to demonstrate with? I wish Collin had a website he had his mixes on.
Wow this was a good catch. It’s not good when the pinouts are different.
I think from looking at the data sheet that I should use pin 2 and pin 3 as listed on the color organ schematic but pin 1 should be the output (instead of pin 6) and pin 8 is 12 Volts (instead of pin 7) and pin 4 is still ground.
Is this Correct?
Pin 2 inverting input
Pin 3 non inverting input
Pin 1 output
Pin 8 12 VDC
Pin 4 ground
Heres the data sheet I’m looking at
http://www.datasheetdir.com/MC33072P+download
yes. you’re completely correct. I also failed to mention If you need the bass to be blue, mid red and treble yellow the capacitor values are wrong for the bandpass filters. the .047 uF will give pass frequencies around 100Hz and the .0022 uF will pass frequencies around 3000 Hz, since F=1/[2(pi)RC].
probably too much info for beginners but your first -3dB point is the equivalent resistance between the 1k and 680 ohm resistor, and your second -3dB point is with a R value of 560k ohms.
Hi Collin
I was wondering if you would be kind enough to either put up or send me a close-up of the #2126272 board you constructed on you video “Circuit Skills: LED Color Organ”
Thank you
Here are front & back shots of my board –
http://www.flickr.com/photos/collinmel/5237190735/
http://www.flickr.com/photos/collinmel/5237111301/
Big thanks to everyone who’s been answering Q’s & sharing info on this project. More project vids are on the way!
Hello sir Collin, i am from India.. i have selected this project for my 12th standard’s electrornics project . Thank you very much for sharing this project and pictures..
Now definitely i will get good grades in my college project. :-)
Thanks for this! It’s surprisingly similar to something I’ve been working on myself. I’m still trying to figure out the optimum filter values for a light organ that will built into a guitar, like the Rickenbacker 331LS.
A couple questions…
Did you intend for the other side of these pots to be connected to real ground? Seems like they, as well as the positive inputs of your filter op-amps, should connect to V-GND, assuming you want a V-GND biased signal going into the filters.
If the above is true, I’m also curious about the 4.7uf capacitor on the output of the amp. Wouldn’t any small DC offset from V-GND just get eaten by the bandpass filters?
Scott, the pots should be connected to power ground, not virtual ground. the purpose of the pots is to be a voltage divider, so you’re basically controlling the sensitivity of the filters because he’s only using a single stage filter which means that if the input is too high, a 1000Hz signal could cause the bass LEDs to light, so you turn the pot so the input voltage is lower to the bass.
The 4.7uF cap is doing just like you said, eating the DC voltage. Because these are active filters, they also amplify the signal. Think of the signal simplified to A*sin(wt)+DC. the filter amplifies all of that, which means your 6V will be amplified and cause your signal to saturate at the positive rail, which means your LEDs will stay on all the time.
Don’t worry though, since the V-gnd is at the filters non-inverting inputs, it will add the offset back into your signal.
I get it now, we’re both right :)
The amp output, the pots, and the 1k/680 dividers could all be tied to any DC level, as long as they are all the same. It’s all AC-coupled to the op amp’s inverting input by the filter capacitors.
So you could either zero the amp’s DC output and tie the dividers to ground (as in your circuit), or use the amp’s output directly and tie the dividers to +6V (which is what I had done in my circuit).
I guess using real ground is better because it creates less additional current demands on V-GND, and then… if the only load on V-GND is the four op-amp inputs, you can maybe get away with just a simple resistive divider V-GND and save the extra op-amp.
Thanks again, I learned something today!
http://img444.imageshack.us/img444/8497/colororgan.png
it’s not on perf board, but this is the layout of my PCB, i only had to use a couple jumpers and from left to right it’s bass, mid, treble
Hi there, i was wonering if anyone could give me any guidelines how i could use this circuit to hoop up some high power leds instead of the existin ones, for example 3 1W leds? I think quite a few people would be interested in this aswell. I would greatly appreciate any help.
Here’s an idea from a circuit I’ve been working on:
http://i82.photobucket.com/albums/j267/jshowlett/peak_drv.png
It puts the peak detector inside an op-amp feedback loop to make adjustment simpler. It expects Vin to be biased around +6V. The current through the LED will be determined by the peak AC amplitude of Vin and by the resistor between the FET and gnd. The given value of 10 ohms pulls approximately 80mA based on a 1 volt peak-to-peak input signal. To increase the current, either increase the AC amplitude of Vin or decrease the resistor value. (for example, 1 ohm would pull 800mA through the LED).
Brightness of the LED is proportional to the AC amplitude of Vin. You just need to make sure that the max expected Vin amplitude doesn’t cause the current to exceed the LED rating.
The Trim pot is for fine adjustment of the “off” state current draw — too far the one way, and the LED will stay off for too much of the Vin amplitude swings. Too fat the other way, and the LED will never quite turn off. I’d like to find a way to have this set automatically, but haven’t gotten around to figuring that out yet.
You should be able to hook this circuit up directly to the outputs of IC1 b/c/d (but you will need to choose the resistor value based on the expected amplitude of these signals and the current you want to pull through your LEDs).
Hi, would you be able to post the schematic where we can see it? I’d very much like to examine and understand your circuit.
Thanks!
– a –
Heh, it’s amazing how long it took me to get this circuit working. During building I left out a couple of power traces and a ground as well. Boy that drove me nuts for awhile. “Thank the Maker for creating Multimeters”, Anyways I tested the board after fixing the problems and it works well.
The Jameco kit did not come with the (2) 160 ohm resistors that protect the Blue LEDS. So I replaced them with 2 220 ohm resistors that I had in my parts stash. I found the Proto board to be a little hard to see well when working on it. Too much silver color makes it a bit tough on the eyes.
Other than that, I plan on driving a some Larger PNP Darlington transistors like the TIP125’s with the output from the NPN 2N3904’s so I can trigger lots more LEDS. More blinky lights = More Fun. Hopefully I’ll get some more parts and build the other channel next for Stereo Blinky light fun.
I updated the schematic for use with the MC34072P Duel Op Amp that comes in the Jameco Kit. I also put the .0022uF and the .047uF Caps in their correct positions. You can get the schematic here..
http://www.teamkiss.com/LEDCOLOR.jpg
the schematic and the part list will change or not.
MC34072P is not easyliy avilb here and is expensive,
and how can i add more LED COLOR ORGAN (bands)…..?
not aware of frequency calcs
I made PCB for COLOR ORGAN but unable to assemble cause of ICs >-(
http://uploadpic.org/view-pic.php?img=126032
http://uploadpic.org/view-pic.php?img=126033
http://uploadpic.org/view-pic.php?img=126034
all the parts are readily available from Jameco.
you can add more bands to it using the equation that i posted in an earlier comment where F=1/2piRC which I got from the wiki on bandpass filters, confirmed by my circuits textbooks.
you can add more bands but your eventually going to run into problems due to the current limitations on the “preamp”
i read it earlier but i’m confused, the value of which R or C should be varied to hv desired frequency….?
is therm any solution for current limitation on preamp..
Lets just Look at the middle of the schematic for the op amp labeled IC1C. There is a 20,000 ohm variable resistor connected in series to a 1000 ohm resistor this gives a maximum of 21,000 ohms if you turn the pot all the way in one direction. These resistor are connected to the Capacitor thats rated at .01 uF(micro farads). The value of either the resistor or the capacitor is what determines the out put frequency Frequency out will equal 1 divided by 2 times (pi) 3.1416 times the resistor value (in ohms) times the Capacitor value in uF (micro Farads) for the center Op amp circuit you get
pi times 2=6.28.
Resistor value times capacitor = 210. 210 times 6.28 = 1318.8
1 divide by 1318.8 =758 Hz (they call it a 900 Hz filter on the schematic)
So the change the maximum frequency allowed you change the value of both of the capacitors connected (-) input for the Op amp. Then you turn The 20,000 om variable resistor for fine tuning of the output frequency.
By the way heres an on-line calculator for Resistor and Capacitor filters.
http://www.muzique.com/schem/filter.htm
MC34072P
http://www.jameco.com/webapp/wcs/stores/servlet/ProductDisplay?langId=-1&storeId=10001&catalogId=10001&productId=251061
Lets do the math for a simple Resistor/Capacitor filter circuit.
Look at the middle of the schematic for the op amp labeled IC1C.
There is a 20,000 Ohm variable resistor connected in series to a 1000 ohm resistor this gives a maximum of 21,000 ohms if you turn the pot all the way in one direction. These resistors are connected to the Capacitor that’s rated at .01 uF (micro farads). The value of either the resistor or the capacitor are what determines the output frequency.
The maximum Frequency out will equal 1 divided by 2 times (pi) 3.1416 times the resistor value (in ohms) times the
Capacitor value in uF (micro Farads).
For the center Op amp circuit you get
Resistor value 21,000 Ohms times Capacitor value .01 uF = 210.
(pi) times 2 =6.28.
The Resistor Capacitor value 210 times 6.28 = 1318.8
1 divided by 1318.8 =758 Hz (they call it a 900 Hz filter on the schematic)
So to change the maximum frequency allowed you change the value of Both of the capacitors connected to the (-) input for the Op Amp IC. in this case the Capacitors connected to PINS 8 and 9.
Then you turn The 20,000 Ohm variable resistor for fine tuning of the output frequency. Kinda like the valve on a garden hose. (The Higher the Resistance the smaller the hose)(Higher Resistance makes for a Lower Frequency)
A Larger Value Capacitor will produce a Lower output frequency. (The bigger the bucket, the slower it fills)
A Smaller Value Capacitor will produce a Higher output frequency. (The smaller the bucket, the faster it fills)
By the way here’s an on-line calculator for Resistor and Capacitor filters.
http://www.muzique.com/schem/filter.htm
The equation that is being used would work but the correct equation is the following:
1
________________ = Frequency Output
2π √(RpR3C1C2)
where 2Ï€= aprrox. 6.28
Rp = R1xR2
_______
R1 + R2
If C1 and C2 are the same value then the equation would look more like:
1
________________ = Frequency Output
2π C√(RpR3)
C1 and C2 in the circuit are the capacitors after the voltage follower, example in the mid range is .01Uf
R1 is the value of the 20K pot and the 1K resistor in series.
R2 is the 680 ohm
R3 is the 560K ohm
In the mid range the 20K pot is adjusted to approx 1250 ohms to get a 902Hz signal as an output.
Hope this helps any trying to configure different frequency ranges for their organ lights
I am planing on installing this into a set of speakers but I want to have only one power source.
what would you recommended?
Parallel with same voltage requirements or something different?
You can send to me,file PCB ?Mrzoxi9x@gmail.com .tks u
Hi Veer, could you please send me the PCB? Thanks :)
Hi collin do you have the PCB of this project??
nice circuit works great!
I like how it uses different caps for the ‘afterglow’ of the Low/Mid/High channels.
But one thing I need to mention; the filter caps in the schematic at the top are mixed
up, low should have the .047uF and high should have the 0.0022uF. It is kinda mentioned
in the comments but it would be helpful to place it at the top of the page.
btw I used an uA741 for the virtual GND, a 324 for the rest and some BD139 transistors
to get more output current for extra LEDs (but I think I’ll need to drive them with an
extra transistor. It works, but only with very small series resistors for the LEDs).
I also used 10K pots instead of 20K and added a input level pot of 50K. Here’s a picture
of my perf version: http://i56.tinypic.com/29uyfef.jpg
Thanks for posting the schematic and the video, which is what convinced me to build it.
The 160 Ohm Resistors listed on the schematic by the blue LEDs are not included with the kit. Jameco is less than helpful with this so you’ll probably need to make sure you already have some or order some with the kit.
After a reply from jameco that simply stated that 160 ohm resistors are not included with kit # 2126272. I mysteriously received some from them today. They must have looked a little closer at what I was saying. Thank you jameco. Now I just need to buy some more parts so I can build the other side.
hye, i’m just wonder about the second IC using in this circuit . In the schematic, the IC it TS921, but in th part list, the second IC is MC34072P. Is there have any different on the output ? and can i use either one of the IC ?
I want to buy this kit but I dont want to plug in an audio jack, I want to use a microphone or speaker as the input signal to the circuit. Has anyone tried this yet? Probably just need to adjust the IC1A’s feedback resistors appropriately for the microphone or speaker selected.
Hey what happened to all of the postings? We already fixed all of the problems in the schematic and parts list…
can you use a lm324 quad op amp instead of the MC33204P and a lm741 or tl082 op amp instead of the MC34072P?
How do you calculate the resistor values for the LEDs if you are using different LEDs than the ones that come with the kit?
Your going to have to use Ohm’s Law. If you take the LEDs Voltage Drop away from the total voltage going into it and then divide this by the Max. Forward Current (all this info should be on the page you saw them on). This gives you the ideal Resistor Value. Their are probably better explantions than this however (I’m not a good teacher).
Has anyone taken the time to make a PCB schematic of this thing on the board that the kit comes with? I’m banging my head against the wall here trying to figure out if I have missed anything, but so far I’ve followed the wiring schematic and I haven’t been able to make this work…all my LED’s light up but don’t react at all to the music.
Also I discovered the 2nd IC listed isn’t the one sent from Jameco, the one they send you is a dual amp so be sure to check out the spec sheet from them because if you just follow the posted schematic, the pins will be different.
This may help other people, but after doing some searching I found close up pictures of Collin’s board on his Flickr account.
http://www.flickr.com/photos/collinmel/5237190735/sizes/o/in/photostream/
http://www.flickr.com/photos/collinmel/5237111301/sizes/o/in/photostream/
Good luck!
you can use any quad op amp. and for the virtual ground use a 741 op amp. yes do have a printed pcb and has a mic too so audio input and mic can be used. plug in audio and it cuts out mic. post interest if want a pcb. pcb is etched, drilled, etc. pin out on a quad is guing to be the same. can use a dual for virtual ground but check pin out. pin out comes on the package. if using different leds start with 1 k ohm, don’t go lower than about 330 ohms. use ohms law to calculate the resistor value. leds are about 2 to 4 volts and 20 ma current are about average. high power leds can use more current. if using 12 volts 12 volts minus the voltage of the led -around 2.7 to 3.5 volts. use a current of 20 milla amps. again use ohms law. not to hard to calculate. don’t want to give all away cause to figure it out yourself makes it easy for you the next time. if not used to bread boarding then putting to a circuit board the best way is to get a pcb, as stated, post if you want one. need an idea of how many are needed. can mount the surface mount mic on pcb for you if want. it’s a cool light organ and works fine.
I designed a PCB for this but it’s not very “clean” and has 2 straps. Can u post your version?
yes I am interested in getting a board from you.
yes I am interested in getting a board from you.
Hey i would like a pcb (but what program do you use ??)
I know this is an older thread, but if anyone is still out there, I DEFINITELY want a pcb and will be more than happy to pay for it!
PLEASE contact me at
sgt350@aol.com
Thanks!
Marc
Hi
Yes I would like a pcb; please contact me so we can arrange it. I’m more that happy to pay for it!
sgt350@aol.com
Marc
there are some changes in the schamatic. the .o47 and .oo22 caps for treable and bass are reversed. use 500k instead of 1 meg ohm on ic1a. also the 1uf and the 22uf caps on the treble and base circuit at the cathodes of the1n4002 are reversed . use .0015 instead of the .047 and .068 instead of the .0022 anyway.
I’m going to give this a try and let you know how it works out. I did notice when I was testing out the color organ that my blue LED’s were responding to the higher frequencies, and the yellow to the lower…I used this :http://www.youtube.com/watch?v=igGroIcga3g
how
hi.. I was wondering if you add more LED lights on would it affect the whole circuit?
First off, I want to say thank you to MakeZine and Collin for making such an awesome little project.
So without further adieu I wanted to share how much project turned out…I decided that I wanted to incorporate some sort of light show into my boombox because originally when I bought the thing, the 2nd tape deck was pretty much trashed. Here are the YouTube videos of how it came out!
Here’s the link to some more pictures and my thread on Boomboxery.com – http://www.boomboxery.com/forum/viewtopic.php?f=47&t=10103
Thanks again!
I just put this kit together, upon testing it I found that higher frequiences turn all 3 sets of LEDs on. Another words when the blue leds come on the other leds also come on with them. If I disconnect the Blue leds the circuit will work properly. I checked all my wiring 2 or 3 times now and made sure there was no shorts on the board. I been trouble shooting it for 3 days now and can not find the problem. Any Ideas on what may be wrong here?
Wesley the thing I noticed when I did this was that the resistors for the yellow and blue LED’s are switched, the yellow should have the 160 ohms (or if your kit like mine didn’t come with it, the next closest) and the blue should have the 1k ohm resistors so that way the LED’s have an even voltage sent to them.
I have been puzzled for awhile trying to recalculate the resistor and capacitor values for a 5 channels colors organ. I am wondering if someone has tried making a 5 channels color organ and it worked. ultimately, i want to make a 5 channels bar graph color organ. I am looking for suggustions and comments. thanks.
I am working on ver2 of the project with the notes from this forum but i have a odd problem if its a problem at all. when i apply power the mid and treb leds light up. the bass leds are completely off. i have played around with different cap values at the quad op amp but no change. could it be the power source im using? its a 12v 1200ma ac to dc power supply. look forward to your feedback and if you would like to see my first go at this project you ca take a look on youtube at http://www.youtube.com/watch?v=qOTekr7Xc_g&feature=channel_video_title.
Brian
Hey Brian Im wondering if you have found a solution to your problem about just the mid and treb lighting up and not the blue. Mine is doing the Same exact thing and I cant figure it out. Any Luck? Thanks
Finally after a couple of weeks of working on this (hour here and an hour there as I could) I’ve finished it. It looks similar to the one Collin did, but I made a few changes in the layout. The next step is to get a synthesizer and see how accurate it is. I made the second version with the changes, so far it looks good from what I listened to through it.
After about a week of messing around with this I fixed it, looks awesome! Check out how I rewired the lights to flash…
Even following the comments and switching the capacitors around for the bass and treble, They still somehow came out backwards…. :/ http://www.youtube.com/watch?v=WAcQ5PrCEQUhttp://www.youtube.com/watch?v=HqNJCga1xBs&feature=related
hi im trying to understand the schematic so that i can make a pcb from it, i was doing okay until i got to the virtual ground which is where i got lost a bit. Does each of the v-gnd off each op amp go to the V+ on the virtual ground and also does this mean that the v-gnd on the virtual ground go back on itself then into the V+ too, thanks
Hi this jack u have probably have 3 legs coz it’s stereo (if u bought it from this kit: http://www.jameco.com/webapp/wcs/stores/servlet/ProductDisplay?langId=-1&storeId=10001&catalogId=10001&productId=2081772)
just use one of chanels and ground- connecting both of them would be a bad idea (can fry urs sound source – not sure but better dont do this)
PS sry for bad english
Has anyone found a step by step tutorial for us, inexperienced builders? or can anyone help me with some problems? :)
Could this kit from Jameco power a whole LED strip per channel off of speaker level?
Need your help on one project. i wanna make led color organ what use usb power source. how i can do that ? you have some ideas or something ? it’s good circuit on laptops. plug in and have fun with partys. please contact me: mc_pesonen@netikka.fi
PS. sorry my bad english
PS. im your fan
Has anyone gotten this to work WITHOUT modifications?
Is the schematic that is posted the correct schematic?
Or has the schematic been updated after the comments were posted?
i am very interested in this concept of separating the bass mid and treble. i want to do something like that on the interior of my car. i suppose this concept can be applied to lights in a car. can i get an email address to try to get answers to questions i have about how i would going about doing this.
I would like a PCB
Hi Nate
Have you had any luck obtaining a pcb? I’m a newbie and really would like to buy one!
Please comment!
Marc
Hi
I had previously seen a posting offering pcb’s of this circuit; can’t find it now!
If ANYONE has a pcb, PLEASE contact me as I am willing to buy it now!
Thanks!
Hello,
im a newbie in electronics and im really stuck at where to connect all those virtual ground points. Do we connect all V-GND points of IC1A, IC1B, IC1C, IC1D to the IC2’s V-GND or is there another logic? Any help is appreciated thanks alot.
one more thing, could it be possible to use 1N4007 diodes instead of 1N4002 ones? because 4002 one is nowhere to be found in my area :(
thanks
I am no longer positive the place you are getting your info, however good topic. I needs to spend a while finding out more or understanding more. Thanks for wonderful info I used to be searching for this information for my mission.
Collin can you hook up instead of LEDs, relays???? And where did u go to collage I’m 16 and I read many books but still I am in need more education on it
Hey Collin, I’m wanting to do this on a bigger scale, for my guitar and amp setup. But I want to do more than just the standard three frequencies that this kit is setup for. I want to be able to have the leds to respond to the placement of octaves as I am playing if at all possible. If you or anyone else can help me figure this one out it would be greatly appreciated.
Thanks from the Wheel House Workshop,
MC
“Keep on Hacking, Tinkering, Modding, and Making!!!!”
what kind of IC above is?
MC32044?
one more thing!
the v-GND of “virtual ground circuit” only connects to other V-GND?
Hi,
is there still help available to get this working? I built it before discovering the ‘correction’ about placement of .0022 and .047 capacitors. Right now, only one ‘channel’ works, the yellow one. It is supposed to be treble, but I have the .047 capacitors on it. Still, it appears to be responding to the higher frequencies.
Anyway, would appreciate some suggestions on how to troubleshoot why the other channels – red & blue – don’t work
thanks!
– a –
excuse me
IC1A IC1B IC1C IC1D IC1D is only one IC use different pin?
Yes. IC1A is the preamp and B-D are for the three channels. Research since my post has led me to believe that the substitute op amp I have isn’t compatible enough. I have ordered the MC33204 to replace it with to see if that will solve my problem
update afterward
– a –
putting in MC33204 in place of TL084 made no difference. I’m at a loss on how to make this work.
excuse me
is the output of virtual ground circuit connects to other 4(pin 3 5 10 12)?
If I had any pride, I wouldn’t say anything further and just slink off and enjoy my color organ.
But, maybe someone else can benefit from reading about my STUPID mistake.
I put the thing away for a while and came back with fresh eyes. Lo and behold, I couldn’t believe when I saw that where the 560 KILO-ohm resistors were supposed to be were measly 560 Ohm ones. Missed by factor of…say…ONE THOUSAND. Good Heavens!
Haven’t made that kind of boneheaded move since my school days.
Good news is, after replacing the 560 ohm with 470,000 (closest I had in my parts box) it works like a champ.
*sheesh*
– a –
Make this battery powered with a microphone input in a little box with high powered LEDs like the ones in cell phone camera flashes and this would make for an awesome portable light show. Raver’s delight!
To anyone building this, i would recommend only building one of the bandpass filters untill you get that one working, then build the rest in the same way, this saves it getting really complicated and making it impossible to understand/troubleshoot
I have just finish it… but i made it without VIRTUAL GROUND. I put everithing on ground(0V) and it work JUST PERFECT :D
TNQ :)
and ofc i used one LM324N (op amp)not like on schematic(MC33204)
wow this is so nice. Hi,can you share your circuit diagram for me. Many thx.
http://makezineblog.files.wordpress.com/2010/10/ledcolororgan-schem_r2.gif
It’s simple, the schematic is the same, you just don’t need to do ”VIRTUAL GROUND”, IGNORE IT… and than where you need to connect op amp on V-GND you just ground it on 0V … datasheet of lm324 is same like this one one schematic.
This thing seems great but can each channel only power 4 led’s? It would be great to make a larger, external display display out of say…. a busted (by a flying wii remote) flatscreen tv.
I can not find the MC33204 and TS291 IC here. can u plz post a list of suitable alternatives for these ICs. any help is much appreciated :)
the filter used is a multiple feed back band pass filter . i calculated the centre fequencies using its formulas and they are way off track, it is showing that ur centre frequency for the bass is in kilo hertz. please can u explain ur circuit. its transfer function. how u designed it?
You can use any general purpose operational amplifier you want, I recommend LM324 or TL074. About the frequencies, I too calculated the values and got them different than on the schematic. I think that’s a mistake that’s been made.
Can we use TIP31 Transistor instead of those you used?
I built the led color organ but the red and the yellow stay on when I apply power and it’s not as powerful. When I plug in my music only the base channel is working but it’s not up to its full brightness. Plz if u have any ideas to help me I would appreasheat them greatly
Try adjusting the potentiometer. If it’s too far toward the opamp, the LEDs will just stay on.
I built this thing recently using just one LM324 quad op-amp for all of the amps and it works fine, saves having to buy more than one IC. Also, i found that if you swap the two 0.047uf caps on IC1B for two 0.1uf (100nf) caps, it seems to react to the beat of the music much better.
Can this circuit run more than just 4 LEDs per frequency? i would like to run an entire LED light show off of this. I have 30 floods, each with 12 LED’s ( 3 wired in series and then those sets of 3 wired paralell). They are designed to be powered by 12V. I am a bit of a newb and have built this circuit although it is not functioning like Collin’s. I intend to make some of the changes mentioned in the previous posts.
I’m building the same circuit later on this week using a 5meter strip of RGB LED’s from ebay. Does anyone know what changes I would need to make to accomadate the higher current pull?
I’ll stick to working with a breadboard for now to see if it’ll even work with the bass frequency.
Did you ever get this working? This is exactly what I wanted to do and I was trying to figure out the changes. I actually was going to go with about a 1 meter strip of each color. Thanks!
I was wondering if anybody has put this up in eagle cad yet and possibly made it into a pcb.
Hi….I have made dis and working really awesome. But i want to use it in my room for that i want to use about 10-12 LEDs for 1 channel. How to do dis. should i connect them in parallel. I was about to do this but for the safe side i m asking first.
It all depends how many mA the led’s take. If you’re running 10-12 of them then I recommend getting a led controller. But im not too sure. Try to hook them up in parallel and if they are dim then explore the idea of a controller.
Hi,
I am a DJ.I want to set up something like this for my home.I will connect 3 meters of led for each channel.So it will be 9 meters in total.Which parts need change or can anyone send me another link for this?I really want to buy this but as i said before, I need more leds.
If you’re driving that many LEDs I suggest getting a led controller. Digikey.com is a great place to go
whats the voltage for the capacitors?
Dear Collin,
Can u make a circuit diagram using that omnigraffle program? I’d really appreciate it!
Ps your vids r awesome…
l made a similar circuit with just one filter(Treble) in it
but it works with only one song “Back in Black” from ac/dc
don’t know what got wrong?
So, I finally got this thing modified to work the way I wanted and built a unique case for presentation. Scroll down to the bottom of this page for video of my interpretation of the LED Color Organ circuit in action: http://kelgadgets.com/k-means-times-one-thousand
I certainly learned a lot trying to figure out how to modify the circuit. Most useful thing, I think, is how to bias a transistor.
Thanks for the great idea!
what is the process for adjusting the three potentiometers? i made this circuit and my last step is to test it but i want to make sure i know how to set this all up before i ruin anything
This is almost perfect for my application, but what if I want a specific frequency range? Lets say two banks of LEDs. One 148Hz and below and one for everything else above that?
I think that the labeled center frequencies on the schematic may be switched. I worked out the transfer function for each of the filters and came up with the following vales for the center frequencies: The filter hooked to the yellow LEDs has a center frequency of 224Hz, then one hooked to the blue LEDs has a center frequency of 4800Hz.
Hi, everyone. I’m a little confused about the schematic. I’m kinda new to electronics, so there are a few things I don’t get right away. So, could anyone explain me the Virtual Ground part? This is what I don’t get:
– What is the input to the virtual ground? The “V+” rail or the “V-GND” rail?
– Why does it say “V-GND again? Do I have to connect that rail to the input too?
– Do I have to build four virtual grounds or I can just connect all of the V-GND outputs to the same virtual ground?
Any help will be appreciated. Thanks a lot in advance!
Hello, a good question, I’m sure by now there have been millions of people screaming out the answers but i thought id help you. The input to the Virtual ground is 50% of the 12V rail (through the resistor voltage divider) and also negative feedback from the output of the opamp. The V-GND means that all things tagged with V-GND will be wired together to that point, no need for four V-GND circuits.
A fantastic audio web page, i think, is one which includes EVERYTHING, and this includes our audio. I’ve truly checked just about every web site, the only real a pair of which might be well worth the moment are usually 8tracks and also Grooveshark.
timberland france#timberland femme http://www.badfox.fr/timberland-bottes/
Anyone people need slacker. net also. For radio, RadioSure and also RadioTime are the best in the world. As well as the best is AudioGalaxy, you can hear every one of the music you will have with your personal computer in your own home, performed computer, anyplace, just awesome. Take pleasure in music!
air max pas cher http://jalpy.com/developpement/airmaxpascher/
Maxis along with DiGi start off offering apple iphone 4g throughout M’siaBy SHARIDAN Mirielle. ALI LEONG INSTALLED YEE
chaussures nike air max pas cher http://www.cheval-toulouse.com/content/nikemaxpascher/
instead of acquiring these disadvantages, apple ipad offers such as warm dessert. . -= Sourish | Hubpages Set up Guide’s final blog site… Why Select All of our WordPress Set up Service =-.
nike air max pas cher http://www.sacredheartemerald.org/images/
Hi what changes would i have to make to this circuit to control 3 10watt led chips, 1 for each colour, i already have these working in the light i want to use but want to upgrade with this circuit too. is there a transistor that i could swap out at the end of the circuit that would give me at least 2 amps as its output from this circuit
thanks
all you need is a 2N3055 or equivalent N-channel power transistor, the 2N3055 is rated for about 15A without a heatsink and is common in old high end amplifiers and power supplies. DONT USE P channel, you need a different way to drive them and they’re just annoying to use, stick to the NPN or N-channel
Hello Julian, i built this curcuit hoping it would drive an LED light strip 5meters in length. The controler is 12v and gives out 6amps, so i substituted the 2n3904 with 2n3055 it still works but will not drive the led strip not at full brightness. What do I need to add or change to get this to power the led strip any feed back would be appreciated. Regards Bill.
Will this circuit drive a LED light strip of 10 metres long?
How could I use this same idea to dim a string of LED’s the higher volume gets? So, reverse of what the circuit does now.
Hi i was wondering what equation you would use to calculate the frequency the filter will let through. I found the following for a “Infinite Gain Multiple Feedback Active Filter” but it doesn’t seem to be right. f = 1/(2*Pi*sqrt(R1*R2*C1*C2)).