


It’s amazing what a little disk can do … when it’s layered with piezoelectric crystals. Piezo disks are impressively sensitive to vibration and can easily be adapted to work as a contact microphones. The trick is the preamp – a basic circuit used to match the piezo’s signal to levels compatible with modern audio gear inputs. The resulting piezo/preamp combo can be used for electrifying an acoustic guitar or simply exploring the lesser-heard world of small sound around us.

The preamp I built is a variation of James T. Hawes’ design. In order to simplify construction, I reversed the MPF102’s source & drain connections from their usual orientation – which works fine in this case.
This thing really is an awful lot of fun to play with – you’ll likely here it used in some of my upcoming video soundtracks!
Subscribe to the MAKE Podcast in iTunes, download the m4v video directly, or watch it on YouTube and Vimeo.
Check out more episodes of Collin’s Lab.
81 thoughts on “Collin’s Lab: DIY Contact Mic”
Comments are closed.
ADVERTISEMENT
Join Make: Community Today


Fantastic! I’ve been kicking around making one of these for my ukulele, now I have more motivation.
Pulled out the breadboard as soon as I saw this. Will be soldering it up after the holiday.
“reversed the MPF102′s source & drain”
Why; is there an advantage this way?
Nope – just made things a bit easier while i was shooting the build. In hindsight, I do wish I’d used the conventional orientation to avoid any confusion.
The drain and source on the MPF102 can be swapped in most circuits. The drain and source are almost identical. Also, if you add a 10uf capacitor across the 560 ohm resistor, you can increase the AC voltage gain.
Great video! I wouldn’t have guessed some of those items would have made sounds like those… cool.
If you added the heat shrink tubing before the epoxy so that the epoxy could grip the tubing instead of the wires would that make it more or less durable I wonder….
yah – that occurred to me post-build. Def sounds like a good idea.
I love how Colin usually plays the dork, but every once in a while he pulls out something like this to remind us that he’s also a total badass.
Nice background music.
When do we get to see the piezo crystals turned into a piezo earphone or microphone? :>
Likely to occur only after I find a few free days to experiment, *and* said experiments turn out successful ;)
unless of course, someone else cares to give it a go …
Collin, that is awesome. I want to do this. I have a Taylor acoustic that I refuse to violate with any hole whatsoever. Perfect solution for a non-destructive way to amplification. Thank you very, very much for posting this. Now, if I might ask a question, where do I start? (Haven’t done much of anything ever with electronics, but I downloaded the How to Solder comic book, and have some (admittedly meager) mechanical ability. Your project doesn’t ‘look’ that complicated, and I thought that I might be able to get away with actually following along and making my own.
Thanks again,
– Travis
Collin, what type of modifications would be needed to have 2 piezo pickups into one pre-amp?
Collin, what type of modifications are needed to have 2 piezos going to the pre-amp?
The piezos need to be wired in series. What that means is you need to solder the red wire of piezo A to the center disk of piezo B, and the black wire of piezo A to the outer disk of piezo B. So red to red, black to black.
I am going to try this too. i am going to have a switch so i can turn one on and one off.
I want to build one of these but am wondering if the piezo buzzers at RadioShack are the same as piezo disks just with a casing since all they have are the buzzers.
Great video and project. Thanks Collin. How about a video on how electret mics work and how to build a really tiny mic that could be used to strap to a wind instrument or one of those mics one sees speakers and performers use. Like the ones seen on TED talks.
This may sound totally silly to y’all, but I’ve build these things before without any sort of pre-amp; just soldered the disk to various types of audio wire or female 1/4” jacks – what exactly is the advantage of using the pre-amp in this case?
I went to radioshack ant tried to get the parts but they didn’t have the 3.3M ohm resistor, I have 220k, 10k, 1.5k, and 560 ohm resistors. Is there a way I can make this with what I got?
If you happen to have 15 of the 220k resistors, you could wire them in series (one end on one to one end of the next). Resistors are added together when tied in series. So 15 * 220000 = 3300000
Yeah, but I only have 5 of each resistor. Thanks though, your response is appreciated. btw, I have no more money to get any more components :(
If you will send me your address (you can find my email address on my website shown in my profile (click on my avatar)) I can send you a couple of resistors.
Awesome Project, easy enough to do too. I got all my parts off ebay (UK so no radio shack). It took longer for my soldering iron to heat up than to assemble the circuit. It worked first time!
Thanks Colin! Keep it up!
What an awesome giveaway!
I don’t know how to read schematics, is there any step by step printed instructions on how to build this???
Hello! Anybody, I’m new to all this stuff so can ANYONE tell me if there are printed instructions on how to build this guitar amp?
I tried to build it by viewing, pausing, and viewing the video over and over – but I can’t see where all the connections should be.
I’m in desperate need of HELP!
Thank you
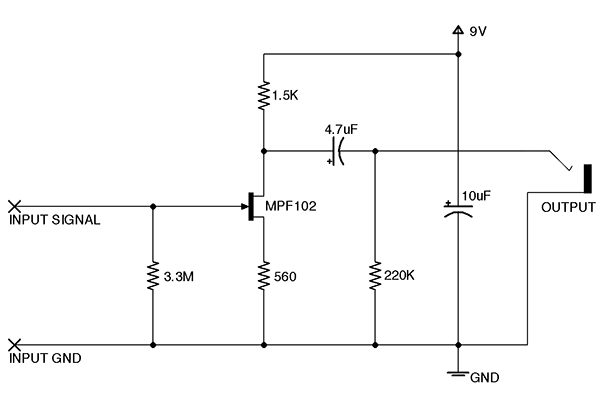
There is no step-by-step for wiring up the circuit. I wouldn’t be too hung up about matching how Collin laid out the board in the video. The schematic above shows what you need to know, but if reading it is new territory for you, Collin has another page & vid in here as an introduction to reading schematics too.
Thanks for you reply Geoff. Much appreciated.
Thanks Collin, this is truly inspirational stuff. I’ve set about making a batch of 5 of these, as everyone I’ve shown this video to wanted one. The first one is up and worked first go tonight which was a pleasant surprise and a credit to you and the detail of your video and instructions. I’ve added a power switch and LED as a battery reminder, and have ordered leather smartphone belt-holsters to mount them in – I hope clipping to the belt or neck strap like a wireless rig would keep the two leads from tangling or getting stressed.
Thanks also for your other tutorials – I think I’ve watched them all now. Please keep ’em coming !
So adding a led does not have any unwanted side effects to the preamp? Led is consuming some voltage anyway. Where should it be located in the schematic?
Just connect the LED parallel and it should be fine.
You see how the 10uF capacitor is connected? Connect the led in the same way (but not on the same line as the cap) with a resistor that fits (I have no idea how much resistance needed).
Thanks.
And what is the fitting resistor, anyone?
Hi Timo, I had a mix of LED colours over the 5 boards, but used 470 Ohm (aiming for approx 10-15mA current) for each. The aim was a dimly lit indicator, which is what I’ve achieved. A smaller resistor might be more appropriate for some colours, such as blue.
http://ledcalc.com/ is a very handy resource for working this out, depending on the LED you choose.
Where are you man?
Is there some way I can order a kit for this?
For protecting the piezo disc, is just regular 2-part epoxy ok as long as it dries clear? I may be over thinking this….
I ended up using a cheap 2-part epoxy. It certainly didn’t dry clear and it works just fine.
I’m also EXTREMLY new to all of this: Am I reading the schematic right? The input signal is the postive end of the piezo, input ground is the negative, the output is the audio jack? Is that right? I get lost when he cuts the end off the rca cable. He only cuts of one end, right? The other goes into the amp?
The RCA cable connects the piezo to the circuit, therefore he cuts both ends. The output jack is connected to the amp.
Ah I think I get it. Thanks! (^_^ ;)>
Do you think it matters if I don’t use an MPF-102 necessarily? Can I use some other transistor?
I don’t know enough about it to know if substitutions are ok. I would think that the choice to use the MPF102 was deliberate though.
You can use another transistor, but one key would be to use a JFET or other FET. The reason being that Piezo disks have a large voltage swing, so you want a large impedance at the input. BJT transistors are current driven, whereas FETs are voltage driven. The piezo element does not produce enough current to probably drive a BJT, so try to find a comparable FET transistor.
@ Reggev It seems Collin used the MPF-102 because the orginal schematic this is based off of used it. So I would be safe and use the same thing. But like I said, I’m new.
Is there some way I can just get the kit or something? As in, ordering all the parts together as a pack easily?
Hi. I hope you have the time to read this.
I Just did everything and tested the piezo mic before adding the mpf102 and the 9v battery. It worked fine. Then, after adding the mpf102 and the 9v battery the piezo mic worked the same way as before. Why are the 9v battery and mpf102 necessary?
Also, it was necessary to solder a cable from the center disk of the piezo to the ground of the output jack to make the piezo mic work. Would you mind telling me what went wrong? Why did I have to solder this cable to the ground of the output?
i wonder if it possible to use 2 earpiece piezo
I can’t see how he attached the cable the the 1/4 inch jack, I have watched it several times and I can’t seem to figure it out; can someone please tell me what they did. I am new to this stuff :L
Hi Olly, if you look at the circuit diagram the 1/4″ jack is at the right with the word “output” under it. The connection that will contact the shaft of the 1/4″ plug on your amp lead is the one shown with the straight line (immediately above the word OUTPUT) and the connection that will contact the tip of your plug is the one designated by the line with the kink (that looks a bit like the spring connector in your physical socket).
So, in this case the tip goes to the 4.7uF capacitor and 220k resistor and the shaft goes to ground. Hope that helps.
Can someone clarify which wires hook up to what? What are the blue and yellow wires for and where do you hook up the piezo disk, output, and power?????
The red piezo wire goes to signal +, black to signal -, the black 9v battery wire goes to ground, the red 9v battery wire goes to 9v, and the output jack connects to output.
I have been working on making some of these for school, and was wondering if a radioshack MPS2222A, NPN Transistor, NPN silicon , TO-92 case, hfe(min) 50, Vcbo 75V, Vceo 40V, Vebo 6V, Ic 600mA, ft 300MHz, Dissipation 625mW, Transistor work instead of the 102 ? i also only bought electrolytic capacitors, so would it still work?
I don’t think that transistor will work…but the capacitors are supposed to be electrolytic, so those will work.
OOH YAY A REPLY!!! Does RadioShack sell any that might work?? I dont really want to order parts online =)
And what about the piezo?
Yes, the Piezo Transducer Element (#273-0073) should work fine….that’s what I used. However, you need to carefully break the plastic case apart to get the piezo disk out…beware of bending the disk!
You really need to use the MPF102 transistor, and Radio Shack should have it…it’s part #276-2062. The store by my house had everything I need in stock; maybe you can ask them to order it in for you.
Thanks.
Also, would a Piezo Tranzducer work? Radioshack ID 273-0073 for the piezo and 276-2009 for the transistor.
i am also using a 1/8 inch jack and a 1/4 inch jack for the outputs.
I don’t see a switch on this schematic….will it still draw power when there’s nothing plugged in? ….or do I need to remove the battery when I’m not using it?
I added a switch on each of ours. Or yes, you’d need to pull the battery.
One good option would be to have a switched jack socket so that the circuit is one when a jack plug is plugged in and switched off when the jack is removed
I’m learning schematics as we speak. In the video I see a few connections to the center leg of the MPF102. If I’m reading correctly on the schematic, it only shows one connection going to the center. (INPUT –> 3.3M –> CENTER LEG)
Can anyone clarify this for me?
Thanks for this wonderful video, Collin!
The problem is that the symbol for a FET transistor does not necessarily follow the package pinout, as in this case. The third leg of the transistor is actually the base, I believe the middle was either gate or source. So when looking at the physical circuit, it will be laid out slightly differently than it might appear in the schematic because of packaging pinouts. You are correct that the base is wired to input signal and to one leg of the 3.3M resistor.
I was thinking of doing something like this for my current project, and I would then send the data straight to an arduino. Do you need the PreAmp then?
Reblogged this on hallrich037.
What should be the modifications if I am extracting electricity from piezoelectric elements by applying pressure?
I followed the schematic and it has no effect on amplitude or impedance. But signal doesn’t pass when it’s not powered… What am I doing wrong?
Hey, really enjoyed the vid. I was just wondering, would it be possible to replace the 9V battery with a 9V dc power socket? so that the circuit could be mains powered? and would it just be as simple as swapping one for the other or would extra bits and bobs need to be put in?
This is coming from a total noob, just in case the term “bits and bobs” didn’t give me away.
Hello there,
is anyone still following this post? I am having some issues. it looks like the level produced by the piezo now is even lower than if I link a piezo straight to an amp… :o
Any ideas??
I want this with a potentiometer, an on off led indicator and a bypass controlled by a foot-switch…. is a potentiometer of any use ?
what are the voltage of the capacitors.. like 50v 4.7uf..
Something above the supply voltage (9v). So 50v should be ok
thanks in advance!
I want to use this preamp and piezo for a cigar box guitar, but want to be able to adjust output from a knob on the guitar. What’re should I put the pot?
what wire is it for the jack plug
I built the piezo preamp but the the sound from the guitar isn’t clear.
I did it just as you describe in the video but I have a BIG PROBLEM. when I’m not playin and I pull out the amp cable the battery is still draining power and in the next day is almost empty. That means something somewhere is completing the circuit even when the guitar is unplugged, but I can´t see where.
It is me or is the diagram. Has anyone having the same problem??
Please help. Thanks
Can u plz say the voltage of all components used in contact mic plz……I have project display on 14 th nov
q – would this work with a smaller supply voltage? say – approx. 4-5 volts?
can i somehow alter this circuit to use 2x AA batteries instead of the 9v block? (so that would be 3v) That would allow me to use my rechargables