


Acrylic has great potential as a building material for would-be makers. It has a very clean look, is easily cut (dremel, table saw, scroll saw, band saw, to name a few), and is durable.
When building your own creations, it’s sometimes necessary to bend the acrylic sheets themselves in order to serve your vision. This can be easily done using little more than scrap wood, a Dremel, circular saw, heat gun, and a vise.
Here we’re going to build an enclosure that has an angled top with a twenty degree slope. Geometrically, this consists of a triangle with vertical legs extending from it. Before we do any bending, some planning is necessary to determine the length of acrylic we’ll use. Time to bust out the old high school trigonometry. I’ve cut down the length of my wood base to 7 5/8″ (or 7.625.) Now I need to find the length of the vertical side. To do this, we use the old SOH CAH TOA trick (side = opposite/hypotenuse, cosine = adjacent/hypotenuse, tangent = opposite/adjacent.) If you need a review, check out this site for a good explanation. I’ll use my example as we go through this, but you can use the same method for any size enclosure you want.

With that we can find the hypotenuse of the triangle using the pythagorean theorem.

We want a 2″ vertical overhang, so we add that, plus another two for the back side. Put it together with the sides of the triangle we found, and we know how long to cut our acrylic.
2 + 2 + 2.745 + 8.1 = 14.845
Now square up your measurements and mark them out on the acrylic. You can cut using many different types of tools. I chose a Dremel with a cut-off wheel. No matter what you’re using, take care as you go, for acrylic can have a tendency to chip and crack.

At this point you should drill or cut any holes you want for your project. It’s much easier to do when the piece is flat. Make sure to use a small drill bit to start and work your way up in size.
Next it’s time to make the jig. The front piece will overhang 2″, so mark that length on a piece of wood that will become your jig. Set your circular or table saw to twenty degrees and cut your piece. Mount this in a vise with the acrylic sandwiched between the jig and another board for protection.


Now it’s time to break out your heat gun. When bending the acrylic you’ll want to slowly wave the gun back and forth as close to the bend point as possible. Push back and down on the acrylic at the same time with a flat piece of wood. The point is to have even heat and pressure so the bend is as straight as possible. It will start to bend a little at first, and then much more quickly. It may be necessary to clamp the exposed edges of the front piece of acrylic so it doesn’t bow out. As the bend goes further, switch to more downward force so the bend is crisp.
For the back of the enclosure, we found the triangle height to be 2.745 inches. Add two inches for the overhang, and cut another jig with a height of 4.745″ at twenty degrees. Repeat the bending process for this piece.

Now flip the enclosure on its side and trace the contours of the bends you made on a fresh piece of acrylic. I find that a fine-tipped Sharpie works best for this. Make sure to do this separately for both sides as the shape will be slightly different. Cut these pieces out and they’ll become the sides of your enclosure.

Use acrylic glue and a needle-nose applicator to attach the sides to the body of the enclosure. This is the best adhesive to use because it actually chemically bonds the acrylic pieces to each other, almost like a weld. Be careful of drips because the glue will eat away at the plastic, marring our clear finish.

The acrylic glue takes five minutes to set, so clamping the piece will be easier. If the sides don’t quite fit perfectly, you may have to clamp it several times, bending slightly to get all the seams to lock in.
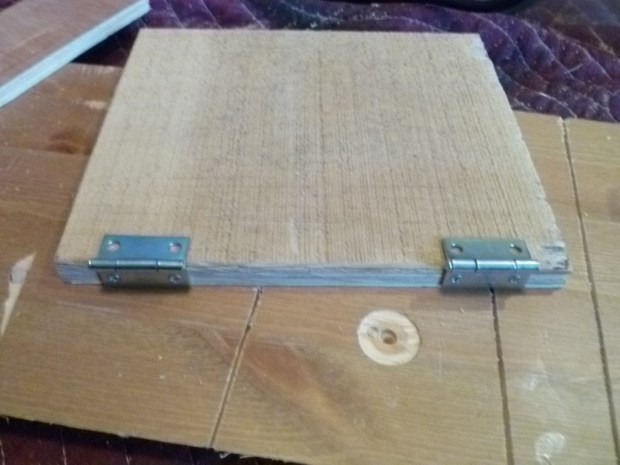
Screw two hinges into the wooden base we’ve made, and drill matching holes into the acrylic. Put small bolts through the hinges and acrylic, and this project is completed. Now the blue Voltron lion waits for electronics to be stuffed into this slick acrylic project box.


24 thoughts on “Workshop Wednesday: How To Heat-Bend Acrylic Enclosures”
Comments are closed.
ADVERTISEMENT
Join Make: Community Today


Nice Article. I have a trick for using the glue bottle. I have worked in the plastic fabrication field for over 30 years. Only fill your bottle 1/2 full of the glue. Holding the bottle upright, squeeze some of the air out of the bottle. When you turn the bottle over the air trying to get back into the bottle will keep glue from dripping before you are ready to apply. Now when you turn the bottle over to start gluing gently squeeze the bottle to apply the glue to your joint starting as far away from you and moving toward you at a fairly quick pace. You will see the glue fill in and you can adjust your speed accordingly. It takes some practice but it will give you a glue joint that is stronger than the plastic itself.
Thom
That is a good tip! The acrylic glue can be tough to work with because it’s so thin and watery.
thanks…..first trick I learned a long time ago…..also I have used the glue you had in the picture but I found that IPS’s Weld-On 4 works better and bonds almost twice as fast.
And if glue drops accidentally somewhere else in the surface you can use car polish to make it “disappear”.
You didnt even sand or flame the ends of the acrylic.
I’ve bent and burned a little as well. Helped a friend build a mold for a windshield bubble for a speed bicycle way back when. A full fairing-enclosed bike. Once we had the mold, he could churn out the bubble in about 15 seconds. The plastic was held over the mold, heated from the top with a heavy duty hot air blower to melt point, and when it begins to sag, you drop it over the mold. Experimentation is the key to learning how long the melt phase lasts. your mileage may vary.
Hey Mikey, I like it! Bending a 90 on small, thin pieces is a piece of cake but your bicycle fairing was obviously more of a challenge. I am going to replicate a boat windshield out of 1/4″ plexi and it will require heating a large area. What did you use? Just a heat gun or something with more volume?
Well I don’t recall heat-bending a bicycle fairing. For something like a boat windshield you’d probably want to try a vacuum former. You can make them yourself…
I just wanted to add that drilling plexi can easily lead to cracks. Try using a stepper bit… much easier with better results. You don’t need an expensive stepper bit a cheap one will do.
I’ve bent and burned a little as well. Helped a friend build a mold for a windshield bubble for a speed bicycle way back when….
A full fairing-enclosed bike.. much easier with better results
Trouble with a heat gun is it’s not very neat and can be at times a little dangerous. Have you seen the latest strip heater on line it’s half the price of normal strip heaters and just as good. I picked one up about 6 weeks ago its called a Rotabend TH1.