This article appeared in Make: Magazine Volume 80. Subscribe today to see more!
One of the largest obstacles I faced when first starting to cosplay was what to do with all the toxic fumes created by a lot of products I needed to use, such as contact cement and spray paint. The easiest thing to do is work outside but that’s not possible in all situations, especially during the winter.
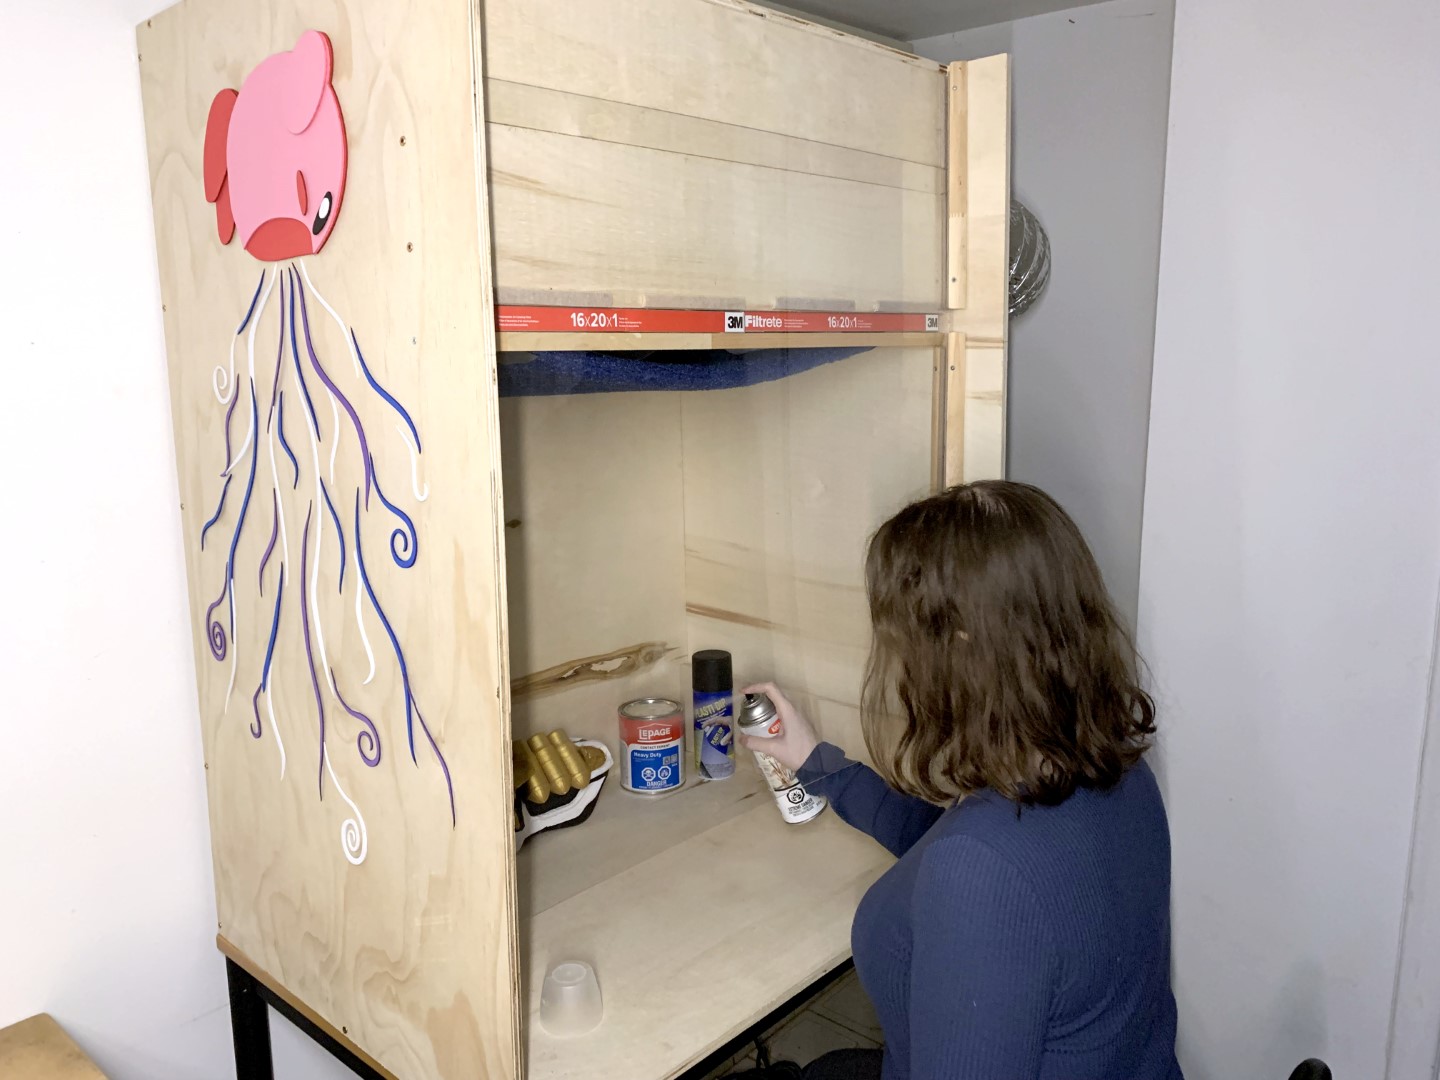
This fume hood allows me to work year-round without the fear of breathing in toxic chemicals. It’s a straightforward build that anyone can do, and with a few adaptations it can also be used for laser cutting fumes, 3D printing fumes, and other noxious or obnoxious emissions.
You can cut the plywood sheets yourself, or get them cut (when you’re buying them) by most hardware stores for a small fee. Show them the cut diagram (above ) and they should be able to cut it for you. They’ll probably tell you they can’t be that precise but that’s okay for our needs. Since the fan will be pulling air into the box, having some small gaps in places is OK since all leaks will be inward, not out into the room. (You may notice that my box has the bottom sticking out a little bit, because I didn’t account for the thickness of the plywood — but that’s fixed in the final measurements.)
Start by attaching one of the side pieces to the back panel. Using the #8×1½” screws, screw through the side, into the edge of the back panel. Putting the bottom into place can help you line everything up . Some tape or a helping hand might be necessary to hold things together while you get started. We did 5 screws per side.
Next, attach the bottom by driving screws through the side you just screwed on and through the back piece, into the edges of the bottom piece. You can prop the whole thing up on some extra pieces of wood or anything else you have lying around to be able to get a good angle on it. Now that there’s a good solid corner it is much easier to attach the other side to the back and bottom.
The last part to attach for now is the top. Lay the whole thing on its back and wedge the top piece between the 2 sides, pushed flush against the back piece. You might have to loosen the screws on either of the side pieces first, if it was cut a little big. Screw into place.
With the box still lying on its back, test-fit the fan. It should be up at the top of the box with the fan on whichever side you want the air duct to exit. Mark where to make a hole on the side using a pencil.
To get started cutting this big circle, first drill some holes using the ½” drill bit. If you’re using a jigsaw, 4 holes around the perimeter of the circle should be fine. If you’re using the hacksaw you’ll have to make the holes much closer together since the hacksaw can’t cut curves. Cut out the circle by connecting the holes.
Using the ½” drill bit again, drill one more hole close to the big circle you just cut out, to feed the fan’s power cord out of. Saw a gap between the two holes large enough to fit the cord through.
Put the fan and filter into place, making sure the arrows on the fan are pointing the airflow outside of the box. In order to get the filter in straight, you may need to start the fan and filter on an angle and turn it into place. You could also loosen or remove one of the sides if you’re still having difficulty.
Now it’s time to mount the filter to the roof of the box. The air filtration kit we bought came with a couple straps, so all that was needed was to drill a couple holes in the roof of the box using a ½” drill bit and I was able to loop the straps through. The filter is not very heavy so this is enough to keep it up. If yours didn’t come with straps, you can use some metal strapping with ½” screws to secure it to the roof.
Once you’re sure everything is working you can use some of the aluminum tape to make the connection between the fan and filter more secure, but it’s OK to leave it for now.
The front is made up of two pieces, so that this project be can be cut from as little plywood as possible. We’ll start by attaching the top front and then move to the bottom front. For this step you’ll either need someone to come hold things while you screw, or you’ll need a lot of tape to hold things in place.
Position the top front piece under the edge of the top piece and screw down into it through the top, using more of the 1½” screws. Then, making sure you won’t hit the screws coming down from the top, screw into it through the sides too. To make sure you’ll hit it, first measure and mark where to drill.
The bottom front piece is secured the same way through the sides.
There are 13 pieces we need to cut from the quarter round molding. Here’s a diagram with the approximate lengths but I’d recommend measuring the space where you need to put them on your own fume hood to get more accurate measurements. Cut them using the compact hacksaw.
The easiest place to start is to line up a piece (1) just inside the bottom edge of the box front, with its other end pressed against the back panel. This molding has two flat faces; you’ll want one against the side and the other facing toward the bottom of the box. Screw it on, using the 1″ screws. I found it was easiest to first drill a hole then use a screwdriver to manually screw the quarter round into place. Do it again on the other side.
Then take a piece (2) and line it up on the back between the two pieces (1) you just attached, and screw it on.
Repeat with the other pieces (1) and (2) to create a 1″ gap below the box front (big enough for your furnace filter to slot into), except this time one of the flat faces on the moldings should point up instead of down.
There’s one more piece needed to complete the filter slot and that’s the piece that goes across to hold up the front of the filters, piece (4). Position this piece in line with the other 3 you just attached, 1″ below the box front. Screw in, starting from the outside of the side panel, the same way you attached the front pieces.
Two furnace filters will slot into this space, side by side, so they’re easy to change out whenever required.
The rest of the quarter round pieces are used to guide the acrylic front window or sash, as it slides up and down. Apply the felt furniture pad strips along one face of each quarter round, and along the side edges of the box front. These will prevent the acrylic sheet from scraping when it’s moved up and down. Put any extra strips along the bottom edge of the box front to help with scraping there as well.
Line up piece (6) with the front face of the fume hood, with its felt facing outward and one end resting on the box bottom, and screw it into place. Find something that is about the same thickness as your acrylic sheet to use as a spacer. I used a couple paint stirring sticks. Sandwich them between the already attached piece (6) and piece (5).
With the spacer between them, screw piece (5) into place with its felt facing inward.
Repeat a similar process on the top with piece (3), using the spacers again but this time lining the end up with the box top.
Do it all again on the other side.
The acrylic sheet should now be able to slot into the channel between the quarter round guides, and slide up and down with ease. If it doesn’t fit, now is the time to trim it down using the plastic cutting tool.
Even though the air is being filtered it still must be vented outdoors to be totally safe. Using a duct clamp, secure the 8″ dryer vent hose to the part of the fan sticking out the side. I found using metal tape alone wasn’t strong enough to hold it in place. Use the duct clamp, then you can tape around it for extra security.
Cut the vent hose so it’s long enough to reach your window with a little extra wiggle room. Tape the 8″-to-6″ reducer to the 6″ duct boot using more aluminum tape. The rectangular shape of the boot makes it easier to vent out a window. Once attached, put the reducer on the end of the vent hose, securing it with tape once again.
All that’s left to do is open a window and stick the duct boot in it. Fill any extra space with a piece of wood or cardboard. Depending on the weather where you live, you might want to take it out whenever it’s not in use to close the window
Turn the fan on and you’re ready to go! Using one of the wood off-cuts, you can prop up the acrylic sash to make room for your hands to fit inside while you’re painting or spraying. If your fan is quite powerful you may need to raise the sash a bit further to let in enough air.
When spray painting, I tape a washable fiberglass furnace filter to the bottom of the other filters to catch the larger particles.
Remember to leave the fan on while anything is drying inside as well, since it could still be giving off fumes.
Now that all the basics are done you can upgrade your fume hood by mounting a light inside or adding a power strip somewhere handy.
A fancy paint job would look nice, or even just some stickers. For mine I opted to laser-cut some foam to make it look like Kirby was sucking all the air up.
Lining the bottom of the box with kraft paper can be a big help with cleaning as well.
This build can be easily upgraded to serve as a fume extraction and filtration system for laser cutting. The key is to add more particle filtration for cutting wood, more carbon filtration for cutting acrylic, and potassium permanganate pellets to filter formaldehyde like in MDF and other engineered-wood products.
This fume hood box design is perfect for adding more filters at the top; just stack up what you need! Go for 4″-thick, pleated filters with a coarse filter first, on the bottom, and then a finer filter on top. You can add more carbon filters at the top if you make ductwork to connect them together.
At the Steamlabs makerspace in downtown Toronto, we made a system to filter the exhaust from our 120W laser cutter. The filter box has coarse Camfil 30/30 D9 25×20×4 filters first, then fine Camfil Opti-Pac OPMV14 24×20×4 filters next. For filtering acrylic, MDF, and other fumes, the system next goes through two pollution control barrels in parallel. These are from General Carbon and each is filled with 86 lbs of silicate compound impregnated with potassium permanganate (GC HS600) and 108 lbs of granular activated carbon (GC 4x8S).
Our websites use cookies to improve your browsing experience. Some of these are essential for the basic functionalities of our websites. In addition, we use third-party cookies to help us analyze and understand usage. These will be stored in your browser only with your consent and you have the option to opt-out. Your choice here will be recorded for all Make.co Websites.
Allow Non-Necessary Cookies
Escape to an island of imagination + innovation as Maker Faire Bay Area returns for its 15th iteration!
Buy Tickets today! SAVE 15% and lock-in your preferred date(s).


 ) and they should be able to cut it for you. They’ll probably tell you they can’t be that precise but that’s okay for our needs. Since the fan will be pulling air into the box, having some small gaps in places is OK since all leaks will be inward, not out into the room. (You may notice that my box has the bottom sticking out a little bit, because I didn’t account for the thickness of the plywood — but that’s fixed in the final measurements.)


