


In the twice-monthly Make: Online Toolbox, we focus mainly on tools that fly under the radar of more conventional tool coverage: in-depth tool-making projects, strange or specialty tools unique to a trade or craft that can be useful elsewhere, tools and techniques you may not know about, but once you do, and incorporate them into your workflow, you’ll wonder how you ever lived without them. And, in the spirit of the times, we pay close attention to tools that you can get on the cheap, make yourself, or refurbish.
This week, as part of “Teach Your Family to Solder Week,” we look at what you need to get started in soldering. We already did a Toolbox column on soldering stations and stands, a staple for more serious soldering. Like anything else, once you get into it, there are all sorts of higher-end products you can invest in. But for starters, here are the bare basics you’ll need. On Wednesday, I’ll do a second installment of the column with more specialty tools you can add to make your soldering experience that much better.

I struggled with soldering for years because I was trying to do it with a super-cheap, low-wattage iron that came with a computer toolkit I got on sale. I finally broke down and bought a Xytronic model and was amazed at how much easier the soldering was and how much better my work looked. My second iron was similar to this model, sold by adafruit industries. Ladyada sells it for $22. It’s a 30W, 110V temperature-adjustable iron. Well worth the money. I’m a big believer in early success when learning something new. The quicker you can get satisfying results and feel that sense of accomplishment, the more likely you are to keep going. In learning to solder, having an iron at least as good as this one will help you have a positive experience right from the start.
[For makers in other countries, adafruit also sell a 220V Euro-version of the same iron.]

Most irons come with a little metal stand that you rest your iron on. These are not trustworthy in the least and the iron is likely to end up in your lap. You need to get a spring-type stand that your iron securely slots into. Inside the large spring holder is a metal sleeve which protects you (and other flesh-covered entities) from getting burned. These stands also come with a sponge that you wet and wipe your iron on to keep it clean. You can get these stands at most electronics suppliers, online and off. The stand above is from adafruit and costs $6.

The spring holder holds your iron, but what holds the circuit boards you’re going to be working on? This gadget, called a Panavise, in this case, the Panavise, Jr. Look on the desk of just about anybody doing serious electronics and you’re likely to find one (or more) of these. Next to a Third Hand (see below), this is the most common jig for holding electronic components while you weld them all together. You can get these at most electronics suppliers. Ladyada sells hers for $28.

Third Hands/Helping Hands are little flexible multi-armed jigs that have alligator clips on the ends to hold components and PCBs in place while you work on them. We’ve covered them pretty extensively on MAKE and you can easily make your own and customize them to your needs. See this round-up and my previous Toolbox column for more details.
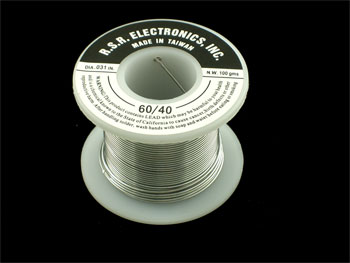

Of course, you need solder to do soldering. So what exactly is solder? Solder is a metal alloy, with different metals in its mix for different applications. The type of solder most commonly found in electronics applications is 60/40 (63% tin/37% lead). This formulation allows the solder to melt at a fairly low temperature, flow smoothly, set-up fast, and cool down quickly. But in recent years, environmental concerns over the lead have caused many people to switch to lead-free solder. Europe, Japan, California, and New York have passed restrictions against the use of lead solder in commercial applications. That means you can still use it for hobby/non-commercial use. A lot of makers I know still use lead-based solder. Lead-free, which is composed largely of tin, with some silver in it to aid melting/flowing, requires higher temperatures and it’s harder to get good joins with it, especially when you’re learning. If you do use lead-free, we recommend a SAC305 solder (96.5% tin, 3% silver, and 0.5% copper ) with a “no clean” flux core. Flux is a substance contained in the center (core) of some solder wire or used in concert with solder. It helps the solder to flow better. “No clean” means that you don’t have to wash or treat the circuit board/components after soldering to remove any excess flux.
You also need to decide on the diameter of the solder wire you’re going to use. I use 0.031″. Some folks prefer 0.025″. After you’ve worked with solder for awhile, you can decide what works best for you.
Whichever type of solder you use, you want to make sure you have really good ventilation in the room you’re working in and you want to able to suck away as much of the solder fumes as possible. Consider building a fume extractor, such as the one detailed in Marc de Vinck’s how-to found here. And try not to breath in the solder fumes are you have your head close in to your work.
Pictured above are a spool of 0.31″ 60/40 “no clean” rosin core from adafruit ($6) and a 10-gram tube of SAC305 lead-free, water-soluble resin-core 0.31″ from SparkFun ($1.95)

One of the things you can do to get good at soldering is to practice taking apart (desoldering) old components and resoldering them. This is fun. Take apart some piece of old tech (with through-hole components) you have lying around, remove all of the components from the PCB, and then soldering them back on. To desolder components, you heat the solder up until it wets (flows) again and then you quickly suck it away before for it hardens again. To do this, you either use a desoldering pump (aka a “solder sucker”) or you use a material called solder wick. The wick material draws the molten solder onto it when you touch it to the wet joint. Some people strongly prefer one over the other. I’m a solder sucker. But it’s a good idea to have both on-hand, as some situations will lend themselves to one technology over another. Above is the standard type of solder sucker (available from adafruit for $5 and SparkFun for $4). The solder wick shown here is a 35′ braid from adafruit ($3).

The last essential tool you need is a pair of diagonal cutters. This is a pair of small, sharp nippers with a tip at an angle so that you can get the blades right up against the PCB/solder join to snip off the leads of components after they’ve been soldered to the board. You can get cheap ones at any hardware/home/electronics store. I prefer a really good pair. I have the exact pair of Xcelite cutters (see above) that adafruit sells ($9). SparkFun has a decent, cheap pair for $2.
Safety Note: Especially when you’re learning (but really, at all times), and most certainly if you’re working with kids around, you want to wear safety glasses, the kids especially so. Solder can sputter, and you definitely don’t want to get any molten metal in your eyes. Everyone around the table/near the work area should have on glasses.
That’s it for essential, beginner tools. With this set-up (and a set of typical project tools, like pliers, screw drivers, tweezers, etc), you could happily solder away on projects, build kits from the Maker Shed, and enjoy satisfying results. But there are other tools that can make your soldering work even easier and better. We’ll cover those in Part 2 of this column on Wednesday.
 MAKEcationers: If you have any questions about solder/soldering tools, feel free to email Dave Hrynkiw, our MAKEcation Camp Counselor at campcounselor@makezine.com
And don’t forget out special Teach Your Family to Solder bundle, available in the Maker Shed.
More:
- Toolbox: Knives out!
- Toolbox: Shop bookshelf (catalogs)
- Toolbox: Shop bookshelf (mechanics, tools, and misc)
- Toolbox: Shop bookshelf (electronics and MCUs)
- Toolbox: Shop tips and show-offs
- Toolbox: What the hell is that thing?
- Toolbox: Soldering station tools and hacks
- Toolbox: Jigs, clamps, and helping hands
- Toolbox: Ten tools you won’t want to live without
- Toolbox: Benchtop power supplies
- Toolbox: Portable lighting
- Toolbox: Portable workbench
- Toolbox: From “miserable old box” to workshop showpiece
12 thoughts on “Toolbox: Soldering essentials, Part 1”
Comments are closed.
ADVERTISEMENT
Join Make: Community Today


Seriously, I made mine from plumbers tape, scrap copper pipe, some screws, half an altoids tin, a sponge from the kitchen, epoxy and a scrap of wood as the base.
I had all this lying around and it took about an hour. It’s not much of a savings, but you don’t have to wait for one to get shipped to you.
Also, instead of an adjustable one, I use a “temperature controlled” Weller WP25. It’s got a small feedback loop which keeps the tip at constant temperature, instead of constant power–so when you touch your tip to your piece, it ramps up the power just as much as is needed to heat the joint. I get similar results as I did with the full soldering workstation I used when I was doing it professionally. The Weller Professional series are inexpensive and very nice. That’s my kit.
(And for when to wear glasses, it’s not especially when you are learning, it is Always. Always. Always. There is no technique to keep the solder from sputtering. It will splash in your eyes at any time and at any skill level.)
0.31″ and 0.25″ – that’s some beefy solder there! You must have missed a leading zero perhaps?
I far prefer to use this type of tip cleaner instead of the sponge/foam:
http://www.timemotion.com/Products/Edsyn-EA439-Dry-Tip-Cleaner__WAS-02-15439.aspx
If trying to stay on a budget you can pick up a brass pot scrubber at the grocery store and stick it in a tuna can wih something heavy at the bottom…
“Solder is a metal allow” did you mean alloy?
Thanks for catching the typos, folks. Fixed!
I use one of those dry brass tip cleaners too and plan on recommending that in Part 2 of my post.
When using diagonal cutters to trim component leads after soldering,
hold the cutters between thumb and 2nd (middle) finger, and place tip of your 1st (pointer) finger loosely on the tip of the lead being cut.
Otherwise, there is a tendency for the cut off section to fly across the room, possibly into your eye, or to become a spike hazard in the carpet!
Don’t push too hard on the end of the component lead, or you will spike your finger. Just firm enough to stop the lead flying away.