


Craig Smith (South Milwaukee, WI) writes:
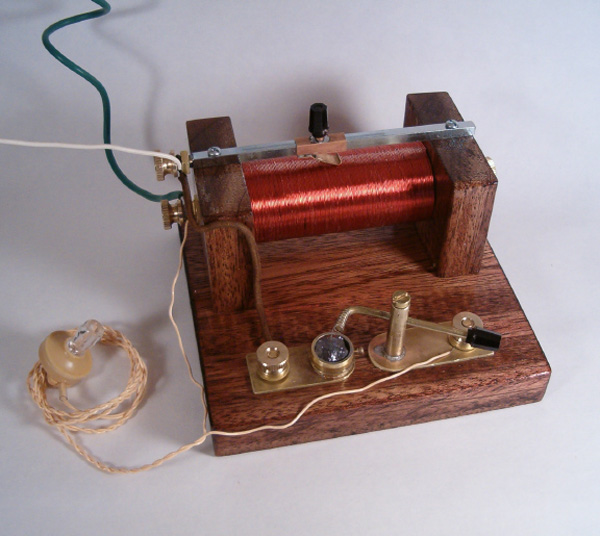
With all of the junk I accumulated, I thought it would be neat to make a crystal radio as a low impact project in the evenings. I unwound the coated wire from a small useless 115V brushless motor that I almost tossed out several times, and wound it about 130 times on a piece of 1.25″ PVC. The clear coating got scraped off where the tuner slides back & forth. Then I made a (nicer that I intended) wood frame for the apparatus, as well as some darn nice scrap brass connection plates for the bolts and burr nuts.
A 40′ scrap wire antenna runs down my fence and into my basement to the slide tuner bar. A small wire also connects the tuner to the crystal pot. A good household ground and one of the earphone wires connects to one of the coil ends. Choose one or the other, one will be better than the other so stick with that one and ignore the other. The second earphone wire connects to the crystal pinpoint contact. To find the ‘sweet spot’ on the Galena (or Pyrite fools gold) crystal which acts as a diode, the contact needs to be positioned about the crystal to find the best spot. One can also just use a nice old glass Germanium diode instead. With a pair of amplified computer speakers instead of the crystal earphone, I can crank it up quite loud. Something about the warm mellow sound of AM radio makes a workshop feel like home.
BTW: For those who are unfamiliar with crystal radios like this, there is no external power source. The radio uses collected radio waves to power the unit.
More great projects from Craig Smith:
8 thoughts on “Lovely junk-built crystal radio”
Comments are closed.
ADVERTISEMENT
Join Make: Community Today


When I was 5 years old I read a book I got from the public library about how to make a crystal radio with a razor blade, a diaper pin, an ear phone, some enamel coated wire and a toilet paper roll.
I sat for hours in my room making the thing, winding the paper tube slowly, making sure the wire didn’t cross and setting everything up just like the book showed. When it came to hooking up the thing to a ‘ground’ I didn’t know what that meant but there was a picture of a sink and the wire hooked up to the plumbing underneath.
I stretched the wire from my room to our bathroom sink and hooked up the copper cable to the sink trap and went to my room to listen for noise. Nothing happened. With nobody to help me I gave up on electronics and moved on to something else, I think balsa wood model airplanes.
It took me many years later to realize that our sink trap was made out of PVC.
I think it’s time to give it another shot.
Thanks for the post Gareth and thanks for the great inspiration Craig!
The big problem with crystal radios is you can make almost every part (although the wire might be difficult) with one exception: the earphone. It’s getting pretty hard to find a piezoelectric earphone anymore and making one can be pretty difficult. I’ve read that you can get piezo crystals out of electronic cigarette lighters and use those to build a homemade speaker. I’ve often wondered if putting the earphone in a vuvuzela would let you listen to the radio without having to put the earphone in your ear.
There are lots of websites on making crystal radios try looking here:
http://blog.makezine.com/archive/2007/04/crystal_radios_round_up.html
http://makearadio.com/crystal/index.php
http://en.wikipedia.org/wiki/Crystal_radio (check the external links)
Great looking radio….
At my house I can get 1130 and almost to 780. But I found the tuning range varies area to area, and mainly the strength of the nearest transmitter. 20 miles away a spanish station is the whole dial. Am building 2 more with longer/larger coil, and another with thinner guage wire.
A circle cutting bit groved a 1/8″ deep circle in the wood for the pipe to seat into. Also the crystal pinpoint adjustment arm has the hole above drilled, tapped, and then the tinyest spring dropped in before the machine screw so the arm is under snug but movable tension.