


Usually I write about ham radio. But looking at communication devices of the future from the past, I thought it would be fun to have a Star Trek: The Original Series Bluetooth communicator for a cellphone. I worked with Dave Clausen to hack one together from a toy Star Trek communicator, a Bluetooth module, and a microcontroller. Following are the directions and program to make your own. And of course a video to show how the Star Trek Bluetooth Communicator works.
And if you really want to geek it up, the Star Trek Bluetooth Communicator can also be used with the Yaesu VX-8R ham radio. It also makes an awesome gift. Read on for the full tutorial.

Tools and Materials
I got most of my parts from Digi-Key and SparkFun. You can also find them at Jameco.
- Toy Star Trek communicator
- Guitar pick, small screwdriver, or knife
- Perf board (e.g. RadioShack part #276-147)
- Hacksaw
- File
- Drill
- Cardboard
- Nibbler tool (e.g. RadioShack #29524)
- Glue gun
- Foam
- AVRISP mk2 programmer
- FTDI TTL-232R-3V3 USB to 3.3V serial cable
- Soldering iron and solder
- Pliers
- Wire strippers/snips
Resistors:
- 10K x8
- 1K x5
Ceramic capacitors:
- 15pF x2
- 0.01uF x1
- 0.1uF x8
- 1uF x2
Electrolytic capacitors:
- 220uF x2
- 270uF (Low ESR) x1
Diodes:
- 1N5817 x1
ICs:
- ATmega168 microcontroller x1
- MCP4821 SPI DAC x1
- OPA344 op-amp x1
- SparkFun WT32 Bluetooth module breakout board x1
- MAX756 boost regulator x1
Headers:
- 2×3 x1
- 1×2 x1
- 1×6 right angle x1
LEDs:
- 3mm red x1
- 3mm yellow x1
- 3mm blue x1
Transistors:
- 2N2222 x1
Miscellaneous:
- Momentary switches x2
- Electret microphone x1
- 8MHz crystal x1
- 8 ohm 1W 28mm speaker x1
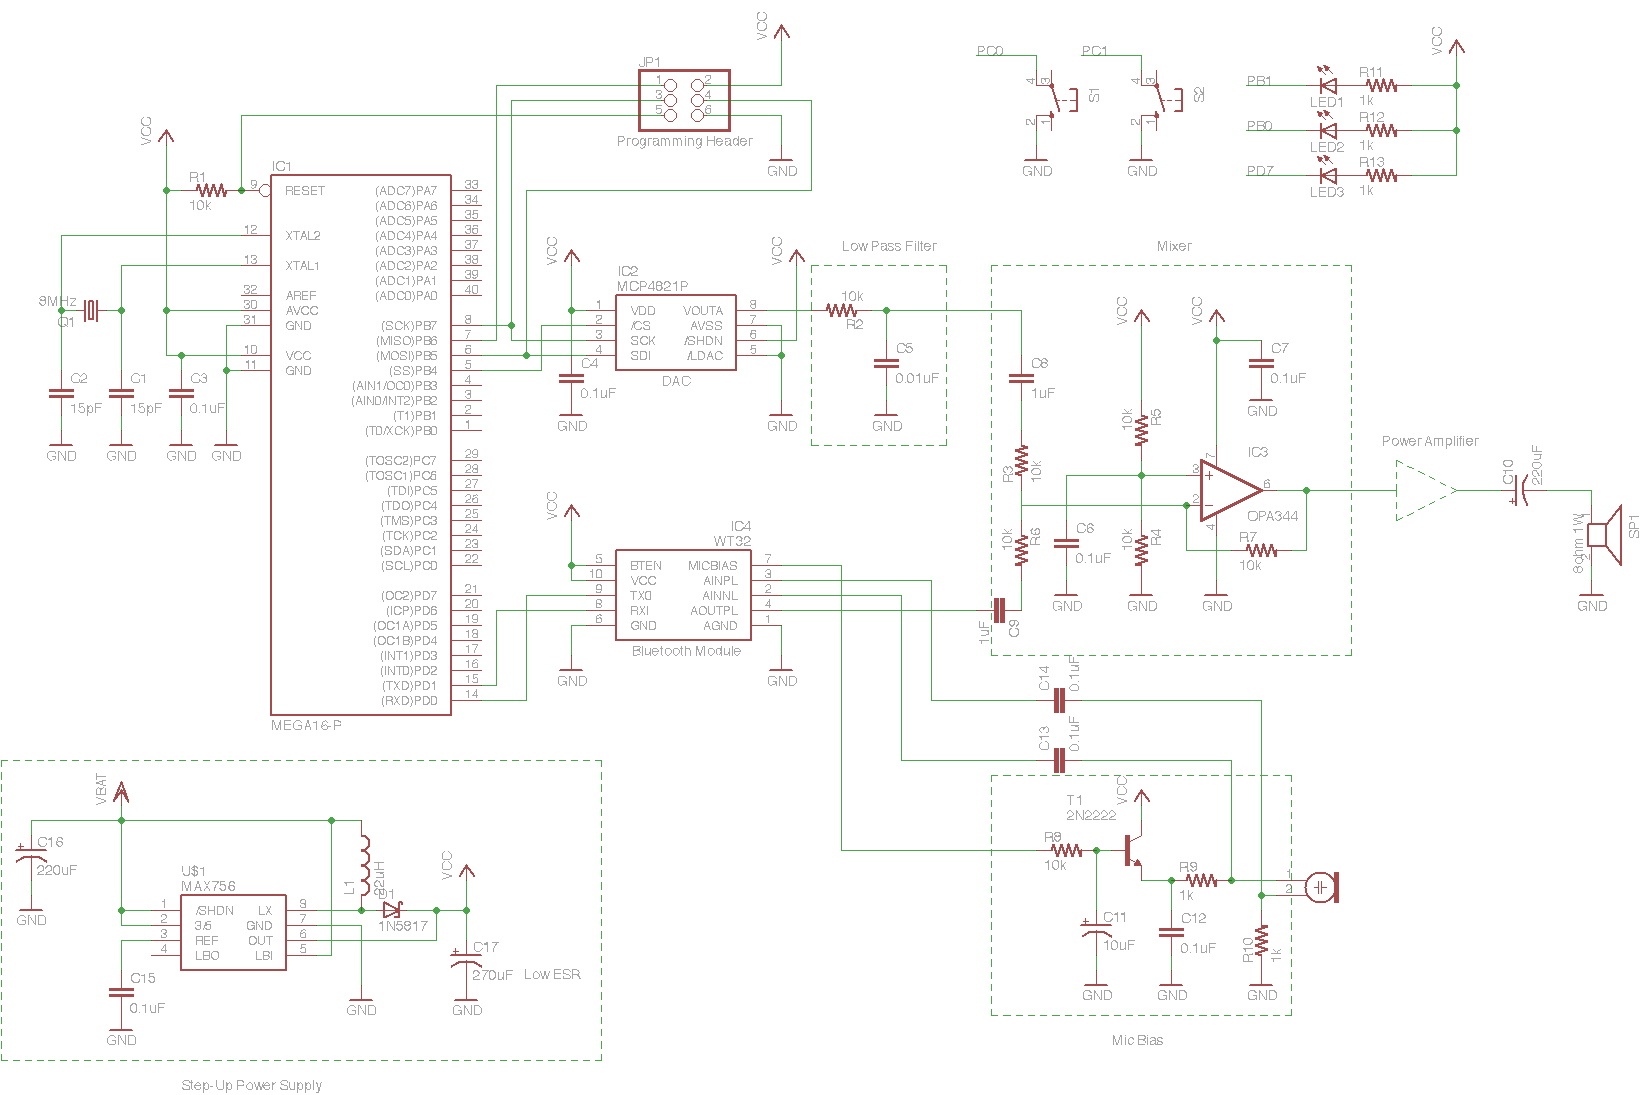
Schematic

Download the full resolution schematic
Directions
1. Take apart the communicator.

1a. Take apart the communicator by removing all screws.

1b. Remove all components from the inside of the communicator, leaving wires to the flip switch (blue) and wires for the battery leads.

1c. Use a guitar pick, small screwdriver, or knife to remove the “rotating array.” Then remove the plastic sheet by pushing it out of the silver ring.

1d. Cut a small piece of foam 3/8″ thick. Put the foam in the communicator to secure the buttons.
2. Custom-cut parts to fit in the communicator.

2a. Cut a circuit board to fit inside the front of the communicator using a hacksaw and a file. Then use a drill to make holes for the plastic screw supports.

2b. Cut a piece of cardboard to the size of the Bluetooth module. Then cut it down so it fits in the available space inside the top front of the communicator.

2c. Use the nibbler to cut the Bluetooth module to size so it fits in the top front of the communicator over the cardboard. Don’t cut more than necessary. On the analog side, don’t cut further than the STAT pin.
3. Assemble the analog board.
(reference schematic)

3a. Start with the switches. These need to be aligned underneath the button holes in the face of the communicator. The switches also need to be tilted to match the incline of the face plate.

3b. Add the DAC, op-amp, capacitor, and other passives.

3d. Add the LEDs and microphone.
4. Assemble the Bluetooth module.
(reference schematic)

Using a 4-conductor ribbon cable, make connections to the ground, RX, TX, and Vcc lines of the Bluetooth module. Tie BTEN to Vcc.
5. Assemble the lower digital board.
(reference schematic)

5a. Using the same technique as in Step 2, cut out the lower digital board so it fits snugly into the top half of the middle piece of the communicator. Before adding components, make cutouts for the large inductor and capacitor so they’ll fit in the closed communicator. Add the microcontroller, regulator, capacitor, inductor, and other passives.

5b. Add the serial port, power, and ISP programming headers.

5c. Connect the boards together using ribbon cable (as done in Step 4 with the Bluetooth module). Connect the power and flip switch leads. Connect the speaker leads to the analog board.

5d. Put the speaker into the “rotating array” ring and secure it with hot glue.
6. Program the communicator.

6b. Power up the device and flash the passive firmware.
6c. Connect the serial cable to your computer. Using your terminal program, configure the Bluetooth module for hands-free device profile. Set the name, pin code, serial port speed, gain, etc. as specified in the sourcecode zipfile.
6d. Remove the serial cable and flash the production firmware.
6e. Confirm that everything works.
7. Put all components back in the communicator and close the case.

Dave will be adding a power amplifier later to make the audio louder. Check for updates on his website.
About the Author:
Diana Eng is MAKE Online’s ham radio correspondent. She is a NYC-based fashion designer, a
Project Runway alumna, creator of FairytaleFashion.org, author of Fashion Geek: Clothes, Accessories, Tech, and co-founder of NYC Resistor.
82 thoughts on “How-To: Make a Star Trek Bluetooth Communicator”
Comments are closed.
ADVERTISEMENT
Join Make: Community Today


Very cool! Another great project Diana.
Awesome job. Should only be a matter of time before your showing us how to make our own Holladeck.
Holla!
Cool beans!
Fantastic job on the project. I was surprised to see all of that fit into the tiny communicator!
AAAHHHH! I did this project a year ago a different way that integrated a headset and the toys actual internal circuit, given; mine works more like a flip phone, this drives me nuts!
i just did some circuit bending to integrate the flip sound from the chip, i too made the onboard buttons the volume buttons (by gluing computer reset buttons over the carbon pads) and did insane surface soldering of thin gauge phone wire onto the contacts of the bluetooth headset! I HAVE to give your method a try now because mine operates as a flip and i’d rather have an outloud. although i have to say, i prefer that mine being rechargeable as it is wont cause me to have to remove that back cover often. I dont know a thing about programming but now I’m apt to learn!
Is there any alternative or some other way to get the board pre-programmed or some cheaper way to get a MKII Programmer? $159.00 dollars and then some for all the extra components is a little expensive.
The AVRISP mkII programmer retails for about $35 at digikey.com. Less expensive alternatives are available, like the USBTinyISP which sells for $22 (as a kit) at adafruit.com.
You could also save about $40 by getting the bare WT32 module rather than the breakout board. You will have to do some delicate soldering, but it wouldn’t be all that difficult.
Hm, that definitely puts this project more within reach for me. Thanks a bunch! :)
I guess I just needed to look around Digikey harder, I couldn’t find the MKII Programmer for anything less than $159 on google shopping. :P
Ya gotta make me one. As I have zero time in the day and two left thumbs, no way I could accomplish this feat myself. Put a few up on ebay & I promise to snatch em up.
Well I’m thinking about building this, because I happen to have an old star trek communicator toy and a bunch of parts laying around… However I think that you left some of the parts off the parts list (inductor, 10uF cap in the bias circuit). Also, what are the two big silver (capacitor-looking) things near the right button and regulator? I was thinking they were capacitors, but then there are 2 electrolytic caps that aren’t in the schematic.
Would this be possible to make a TNG version of this with a lapel version
I’m in the process of making this project but there are a lot of holes in the tutorial.
1-There are 2 parts in the schematic that is not in the part list (mentioned above). Were they omitted by choice or forgotten?
2-There are 2 switches and 3 LEDs on the schematic. Which is switch 1 and 2 on the actual device? Which LED is the Blue, Red and Yellow?
3-The programming header is well defined on the schematic but what about the serial port (6 straight pins) and the 2 pins? How are they connected?
1-The two extra parts seen in the schematics are needed. We can see the inductor in one of the photos with the ATMega and the power supply circuit.
2-I’m going with the assumption that, in the photo with switches facing us, Switch 1 is on the left (Volume Down) and Switch 2 is on the right (Volume Up).
The LEDs, if the 2 LEDs are just for light show (light chaser) then it doesn’t really matter how you connect them. However if the lights are suppose to represent different states of the device (e.g Blue light on for Bluetooth connected), then it would be helpful to know which pin will provide that function
3-The 2 pin is for Power, the batteries are connected to them, I’m going to use them as a means to apply external power to the device.
The only unknown is the serial port….What are the pins it’s suppose to be connected to? If anyone has an idea, please let me know…!
man forget making one i would buy one!!!!!
I think I would rather just buy one too. I mean I know I would be able to build one but I really don’t want to.
I think I would rather just buy one too. I mean I know I would be able to build one but I really don’t want to.
Ditto the last 2 posts. This would make a great STOS novelty item.
An actual communicator the REALLY works!
It’d be neat to have at a convention!
how the heck do i just buy one… please respond
Hi Helaina
how the heck do i just buy one… please respond
I’ve occassionally seen these end up on ebay with a starting bid of $300
MY QUESTION IS WITH THE ATM 168 PROCESSOR… YOUR SCHEMATIC SHOWS 40 CONTACTE THE CHIP HAS 28 ( SAME IN THE PIC) I HAVE GOTTEN THE DATA SHEET FROM THE MANIFACTURER AND CAN MATCH ALL BUT ONE CONNECTION THE ONE FOR THE LED LABLED PC5 OC2… THE CHIP HAS AN OC2A AND B CONTACT WHICH ONE SHOULD IT GO TO>
SORRY THAT IS PD7 (OC2)
THE SCHEMATIC CALLS FOR A 16 P PROCESSOR BUT THE MATERIALS LIST CALLS FOR A 168 PROCESSOR, THE PICTURE SHOWS A 168 PROCESSOR
HOW DID YOU WIRE IT UP , DIANA? I CAM MATCH ALL ON THE SCHEMATIC EXCEPT THE LED THAT GOES TO PD7 ( AS IT IS AN XTAL NOT OC2)
Hallo Dave,
cant you send the original Eagle Sheet from the Project?
thanks
Erik
No sheet , I pulled spec from manif and crossed match pins to orig schematic
T-Mobile. America’s First Nationwide 4G Network
Would it be possible to remove the speaker so it simply transmits audio to a bluetooth receiver? Would one remove the ‘mixer’ & the speaker or is the ‘mixer’ required for full functionality?
I was looking into building this with a friend however we have little experience with this particular kind of thing. While I’m sure we can assemble the device if someone could explain briefly how the actual flashing of the device works and how to use the terminal to set the information. Finally is she referring to the Terminal app in OS X?
You can see the mac in some of the pictures, i assumed it was Terminal in OS X. There have been other questions raised by Dave Goggin and Derell Nar that I wish someone would answer.
overdue thanx to diana and dave…chip pin info for others… 168 chip to 16b shown
pin 1=9, 2=14,3=15,4=16,5=17,6=1,7=10,8=11,9=13,10=12,11=2,12=3,13=4,14=20,15=19, 16=5,,17=6,18=7,19=8,20=30,21=32,22=31,23=40,24=39,25=38,26=37,27=23,28=22
It looks like SparkFun has discontinued the WT32 Bluetooth module breakout board. Is there another that would be compatible? This is my first attempt of a circuit of this magnitude.
https://www.sparkfun.com/products/8952
You can buy WT32 breakout boards from Ebay and Amazon.
http://www.ebay.com/sch/i.html?_trksid=p2050601.m570.l1313.TR0.TRC0&_nkw=wt32+breakout+board&_sacat=0&_from=R40
http://www.amazon.com/EWS-WT32-Breakout-Board/dp/B00BR1N062/ref=sr_1_1?ie=UTF8&qid=1369123739&sr=8-1&keywords=wt32+breakout+board
There’s also BETZtechnik that sells the board without the module
http://betztechnik.ca/wt-32-breakout-board/
I CUT OUT THE BATTERY COMPARTMENT AND INSTALLED A USB CHARGER AND LIPO BATTERY THAT I PURCHASED FROM SPARK FUN FOR 24.95… WORKS GREAT AND NOW CAN BE RECHARGED VIA USB
If you would be willing to make this for me I’d be willing to entertain prices. I have a diamond select communicator already.
great idea, but not a fan of the original series communicators. Anyone have the design to make a next generation Bluetooth communicator?
CAN SOMEONE MAKE THIS FOR ME PLEASE??!! I’m totally electric-illiterate, but I NEED one of these. Pretty PLEASE!!! You guys should sell them. Someone please let me know how much it costs to make it.
The Tutorial so far sounds great, anyhow. It lacks a few things. The Pin Description for the Bluetooth Module for example. The Breakout board in the Tutorial does have Pins, the new Version listed in the Comments does not have. I checked and found no Pins labeled BTEN or VCC. It would be nice to add a description for the ports and maybe a comparsion how to wire it to the Board listed in the Comments, since the one you used in the tutorial ist nearly not to be gotten anywhere.
Hello there I am making a project for collage fair can any one of you tell me that how can i make a bluetooth button as i am making a helmet for some purpose so is it possible that i may connect a wireless button so it may be easier plz reply i need a solution
Hi there would you mind letting me know which hosting company you’re working with?
I’ve loaded your blog in 3 different browsers and I
must say this blog loads a lot faster then most.
Can you suggest a good web hosting provider at a fair price?
Thanks, I appreciate it!
freaking sweet !!!
Is there any measurements for the switches, microphone, or headers??
I LOVE YOU!!!! I was looking for something like this!!!