


For our bike theme and Skill Builder series this month, we’ve asked mountain bike racer Chris Nodder to help us out. Chris is the author of Bike Boo Boos, a book (and website) about fixing bikes when you’re on the trail and need to fix your ride on the fly. Here he describes how to fix a broken chain. — Gareth
Chain Breaking and Joining
By Chris Nodder
If your chain breaks on the trail, it can normally be fixed very easily with a chain tool. The tool is designed to push out the rivets that hold the chain together. Good chain tools are designed to stop pushing just before the rivet leaves the chain completely, thus making it easy to push the rivet back through when you re-join the chain.
 Common type of bike chain tool
Using a Chain Tool
Find the break in the chain (pretty obvious) or the twisted or stiff link (shift to the smallest front and rear cogs, then run the chain backwards. Watch the lower pulley on the rear derailleur – when the pulley “skips,” you’ve found your bad link).
Before you even use the chain tool, if you have a stiff link, just grab the edges of the chain on either side of the stiff link, place your thumbs on the plates of the stiff link, and bend the chain from side to side. That should be sufficient to loosen the tight rivet.

To remove a twisted or broken link and rejoin the chain:
- Place the chain on the normal cradle of the chain tool with the rivet closest to the bad link lined up with the chain tool pin.
- Use the chain tool to push this rivet through so that it is almost popping out of the opposite plate.
- Now, you should be able to remove the bad link by removing the chain from the tool and twisting it to separate the chain at this location.
- Do the same on the other side of the bad link, being careful to end up with an inside and an outside piece of chain to join together.
- Now, pop the inside piece that you are left with into the outside piece making sure that the roller is in place and that the rivet lines up with the hole. Use the chain tool to push the rivet back through.
- As soon as the rivet has emerged through the outside plate as much as the neighboring rivets, stop and move the chain onto the tight link cradle part of the tool to finish tightening the rivet through. This way, the outside plate is free to move, so the link doesn’t end up tight.
The same procedure obviously works for shortening a chain.
Tips:
- If you have the time to think about it, push the pins out towards the drive side of the bike when splitting the chain, as this makes them simpler to work on when re-joining them.
- Bring the two pieces to be joined to the bottom of the loop (between the rear derailleur and the bottom of the chain rings) as the rear derailleur then allows you to take up slack as needed.
- Check you threaded the chain through everything it needs to be threaded through (front and rear derailleurs, rear frame triangle) before joining it again.
- Some chains (notably Shimano HG) require a special rivet to replace the one you remove with the chain tool. You can use the existing one, but it won’t be very strong, so it’s only good as a temporary repair.
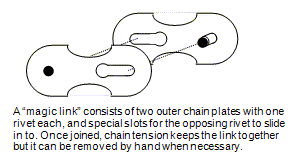
- If you are using a “magic link” (SRAM PowerLink or similar), leave two inside links free when you break the chain. The magic link replaces an outer link.

More:
- See all of our bike coverage on MAKE
- Follow the Bike Shop Skill Builder series
6 thoughts on “Skill Builder: Bike Chain Repair”
Comments are closed.
ADVERTISEMENT
Join Make: Community Today


This is good to have on any long ride when you will be far from a bike shop. I’ve had a friends rear shifter complete break in half and used one of these little guys to shorten the chain down to a single speed for the rest of the ride.
Not mentioned here is that it is inadvisable to re-assemble the pins in 9, 10, or 11 speed chain. These narrow chains have the ends of the pins “mushroomed” to keep them in place; when you push the pin out, it broaches the hole in the outer side plate to a larger diameter and a re-assembled chain will be likely to come apart at that spot. (DAMHIK, as the saying goes.) One must use “magic links,” special break away connector pins, or a motorcycle-type chain riveting press for narrow chains.
I always carry a spare “magic link” with my patch kit.
Wider, 5-6-7-8 speed chains have the pin protruding far enough past the outer plates that the mushrooming isn’t done.
The only time your chain will break, is when you don’t have a chain tool. Conversely, once you buy one, (probably after breaking your chain and not having one…) you will never break it again.
That’s my story, and I’m sticking to it.