


By Diane Gilleland
If you want to celebrate Halloween in a historical way this year, try carving turnips instead of pumpkins.
One of the holiday’s oldest legends is the Celtic tale of Jack O’ Lantern. There are many versions, but essentially the story goes like this: Jack was a man who, through a series of adventures, successfully tricked the Devil. As a result of this prank, after Jack died he couldn’t find a place in either Heaven or Hell, so he had to wander the earth for eternity. He would light his way on these travels by hiding a glowing ember in a hollowed-out turnip.
The use of a pumpkin instead of a turnip originated here in America – as it turns out, pumpkins are far more plentiful here, so they became the lantern of choice for Halloween celebrations.
But, try a traditional turnip lantern – or a group of them! They make a wonderful decoration for a small space, and turnips have a magnificent, warty, monster-like quality all their own.

Materials
Large turnip any variety is fine
Sharp kitchen knife
Cutting board
Melon baller
Pencil
Pumpkin carving saw kit
Battery-powered tea light
Wax paper or freezer paper optional
Directions

Step 1: First, decide how you want your turnip to be oriented. Which warts, scars, and hairy bits do you want to have showing on the front of your finished lantern? Which side will be the bottom?

Step 2: With a sharp kitchen knife, cut away the section you decide is the bottom. This cut creates a flat base for your lantern.
(I find it simpler to make my Turnip-O-Lanterns this way rather than cutting the top off, as you might do with a pumpkin. Since turnips are not hollow, it can be difficult to cut a lid that fits precisely on the top. This method of cutting the bottom results in a neater finish.)
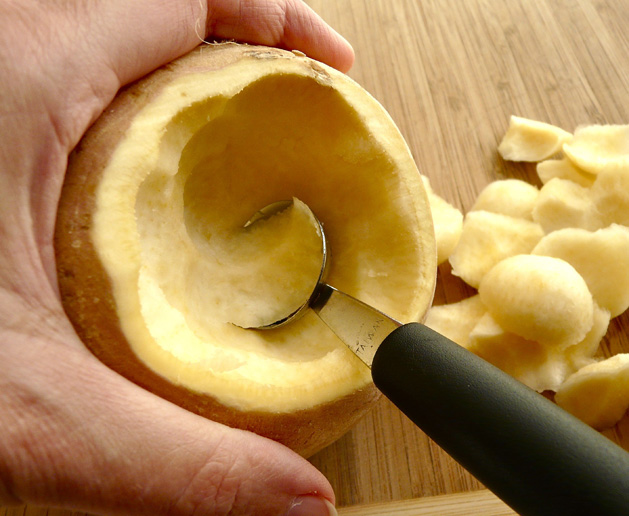
Step 3: Next, use a melon baller to scoop out the inside of the turnip.
Note: Turnip flesh is somewhat firmer than pumpkin flesh, and of course, a turnip is solid, so this scooping-out process may require a little muscle. I find it’s easiest to dig the melon baller into the turnip with a twisting motion, pulling out small scoops. If you’re doing this project with children, you may want to complete this step for them.
Step 4: Ultimately, you want to hollow out the turnip so only about a 1/2″ wall remains. I find that the turnip flesh gets a little harder near this point, so you’ll likely be able to feel this as you’re scooping.
Maybe you can add the scooped-out turnip flesh to a soup, or make some mash for dinner.

Step 5: If you like, use a pencil to draw a face design on the turnip. (It won’t mark the turnip really – it just digs into the skin a little and leaves an impression.)
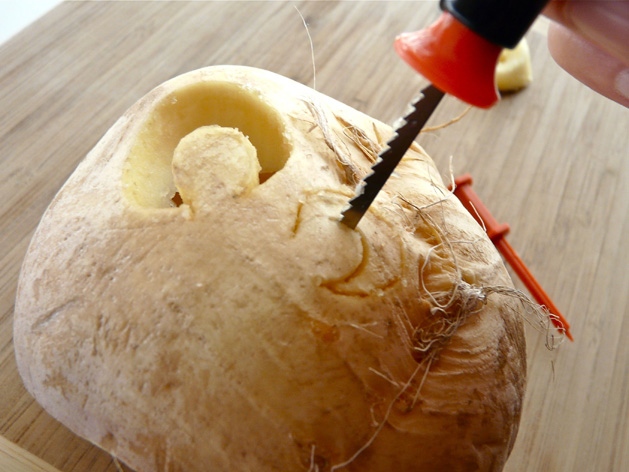
Step 6: Use a pumpkin-carving saw to cut out the face along the lines you drew, following the saw’s package directions.
(You can also cut the face with a small paring knife, but I find that the pumpkin-carving saws cut so easily through the turnip wall, and they make cutting small details much simpler and safer.)

Step 7: Because turnips are so much smaller than most pumpkins, you’ll find that battery-powered tealights are the best way to light them. Turnips generally won’t allow enough oxygen inside to keep a burning candle lit, and the heat from a burning candle can actually begin to cook the turnip, so it gets soft and spoils faster.
To display your Turnip-O-Lantern, turn on the battery tealight and place the lantern over it. If want to protect the surface under the turnip, you can set the lantern on a circle of wax paper or freezer paper – or a small plate.

How long will your Turnip-O-Lantern last?
Displayed indoors, a Turnip-O-Lantern should last about three days. It will dry out and wrinkle a bit during that time, but this only contributes to its monstrous quality. Oudoors in a cool environment, your lantern can last about five days.
If you want to keep a Turnip-O-Lantern fresh overnight, you can place it in your refrigerator, loosely covered with a plastic bag.
![]()
Inspired to craft something for Halloween? Be sure to enter it in our CRAFT Halloween contest to win cool prizes. Costumes, decor, food – whatever you create for Halloween is welcome in the contest. Read our full contest page for all the details. Deadline to enter is November 2.
About the Author:

Diane Gilleland produces CraftyPod, a blog and bi-weekly podcast about making stuff. Her first book, Kanzashi In Bloom is currently out in bookstores.
5 thoughts on “How-To: Carve a Turnip-O-Lantern”
Comments are closed.
ADVERTISEMENT
Join Make: Community Today


AWESOME!!! Thank you for this posting, not many ppl know that it was a turnip before the pumkin anymore. Great work. I was taught to make the face upside down so you could hold it upsidedown to make the face right side up. Not only as a light for the night but to ward off evil spirts :D
Being Pagan we’ve been doing this for 40+ years I can remember and did with my daughters. We make a big production and family outing of picking the largest one. My favorite on was the year I carved Smog from The Hobbit!
I’m truly enjoying the design and layout of your website. It’s a very easy on the eyes which makes it much more enjoyable
for me to come here and visit more often. Did you hire out a designer to
create your theme? Great work!
[…] with the more abundant and easier-to-carve pumpkins. If you have a few hours this weekend, try carving a turnip. Being solid rather than hollow, they are much harder to carve out, but the smell of a Halloween […]
[…] Photo source Makezine. […]