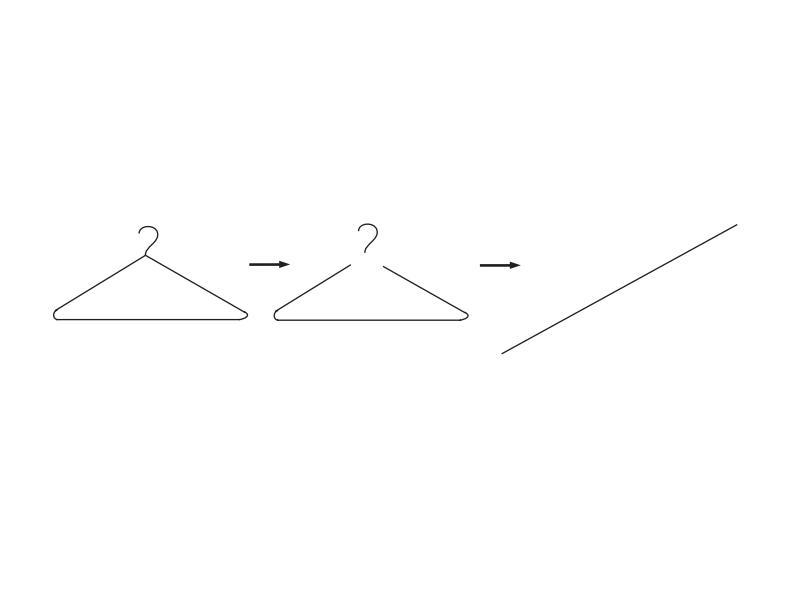
Make: Projects

Digital TV Coat-Hanger Antenna

Build your own digital TV antenna from wire hangers, a piece of wood and some pipe.

Digital TV Coat-Hanger Antenna

Television antennas are comprised of a series of metal rods cut to exact lengths and positioned so they receive a particular television frequency. The following design was invented in the 1960s by an engineer named Doyt Hoverman. It is particularly sensitive in the UHF frequency range, the same range used for the majority of digital television transmissions.

This isn’t a project of my making, I merely wanted to comment on it in this space. All credit goes to Make:television for posting the (attached) instruction PDF.

Watch John Park do this.

Steps

Step #1: Mark the antenna frame

Next
Digital TV Coat-Hanger AntennaDigital TV Coat-Hanger AntennaDigital TV Coat-Hanger Antenna
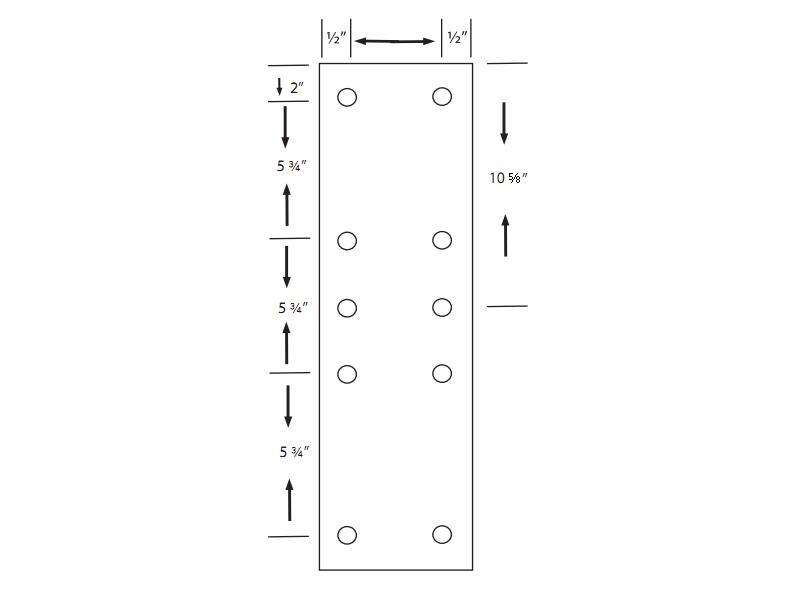
  • Begin construction of the antenna by marking a 3” x 20” board as shown. Note that these dimensions are important to get a good signal with the finished antenna.
  • This diagram was modified from the version in the PDF.

Step #2: Drill holes for mounting screws

Next
  • Drill a 1/16" pilot hole for each screw location.
  • Don't forget the middle two holes!

Step #3: Cut four coat hangers and remove finish

Next
Digital TV Coat-Hanger Antenna
  • Cut apart four wire coat hangers as shown in the diagram to obain eight V-shaped pieces of wire.
  • Once you have the V shape, cut the legs to be 8" long as measured from the bend.
  • The ends should be 3" apart.
  • Remove any paint or varnish at the bottom of the V so they’ll make good electrical contact.

Step #4: Cut and straighten two coat hangers

Next
Digital TV Coat-Hanger Antenna
  • Cut the hooks off of two coat hangers, and straighten them out with pliers to obtain two wires, at least 22” long.

Step #5: Attach wires to board

Next
Digital TV Coat-Hanger Antenna
  • Attach the wire pieces as shown, bending the wire to make good electrical contact with the screw heads.
  • Note how the straight wires cross back and forth between the screws.
  • Remove insulation from coat hangers at all 10 contact points.
  • Insulate wires (with electrical tape) at points where they cross on the board.

Step #6: Attach TV transformer

Digital TV Coat-Hanger Antenna
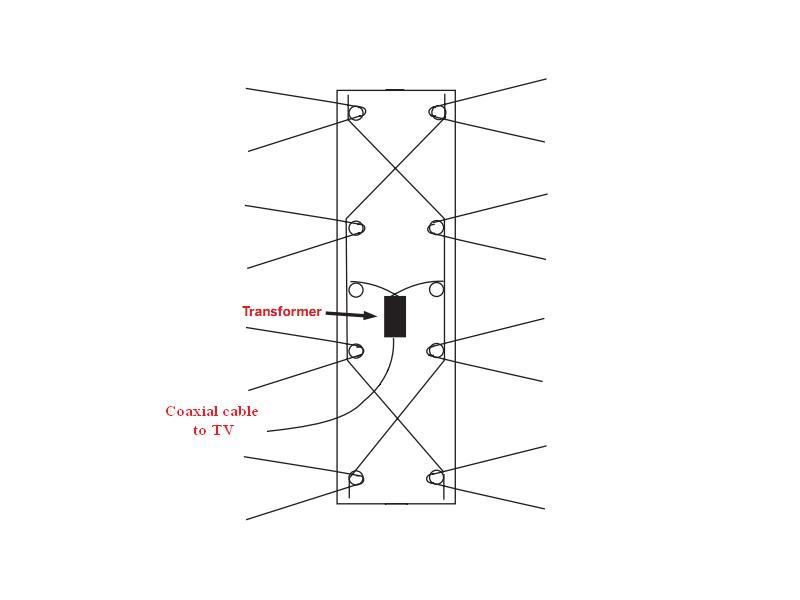
  • Attach the matching transformer to the center two connections of the antenna.

Conclusion

I put this project here because I completed it and wanted to add my comments. I omitted the base which I didn't build, and updated the schematic. Please move or modify it as necessary for content and copyright compliance!

4 Responses to Digital TV Coat-Hanger Antenna

  1. Frank wang on said:

    Hi, how are you! glad to read your comment. I want to build it too, but I don’t have matching transformer. could you please tell me which store to buy from. thank you.
    my email is huangshiyufu@hotmail.com

  2. That’s a tough one… Try using all the same type of hanger, and maybe try a few different types of hanger to see which works best. Make sure there is good contact everywhere the metal should be connecting, and that the wires are insulated where they should not be connecting. The angles are very precise, and in my model I’m always surprised how little motions can destroy the reception. Let us know if you sort it out, and what you try!

  3. One thing the transformer does is take the coaxial cable and split it into two wires. I don’t know if a transformer does things other than that. To mimic it, try using alligator clips, or soldering wires separately to the inner wire and the ‘shielding’. See http://en.wikipedia.org/wiki/Coaxial_cable to get a good picture of the wires. Attach the shielding to one of the center connections, and the inner wire to the other. Let me know how it goes!

  4. This provides more channels and better reception than any store-bought antenna I have tried. I mounted mine on a wall near the ceiling and facing the transmitters in my area. Rather than plugging it in directly to the t.v., I plugged it into the amplifier box from the RCA flat digital antenna which it replaced and which never worked that well.

Leave a Reply

Fill in your details below or click an icon to log in:

WordPress.com Logo

You are commenting using your WordPress.com account. Log Out / Change )

Twitter picture

You are commenting using your Twitter account. Log Out / Change )

Facebook photo

You are commenting using your Facebook account. Log Out / Change )

Connecting to %s

%d bloggers like this: