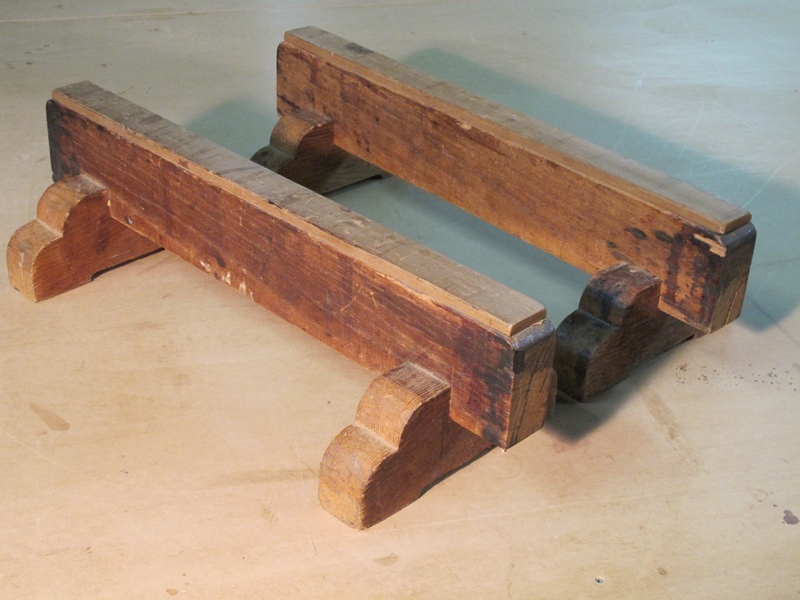
Constructed using a two by four and a couple of hand tools, low horses are cheap and easy to build. Anything will do, but hardwoods like oak or hickory are best. When choosing your wood, always choose the clearest and straightest lumber available. The most important element is line connecting. Working both sides at an angle to create a peak in the center, and then gradually reducing the peak to a flat. This approach will give you much more control and cleaner, more accurate results

Project Steps

Preparing the Parts

Start by breaking the two by four down into its parts (four 8″ long legs and two 22″ long beams).

Layout

Use half-lap joints to join the legs to the beam. Precision is important, so take your time.

Find the center by measuring a leg in from each end, and the center of its thickness using the other leg.

Place one leg on the other with center lines together and then mark to either side. It’s easier to make the mark by adjusting the square to the length and marking from it.

Transfer the line to the other three, both on the edge and about 1/2″ down either side. These are the shoulder lines.

Layout (Continued)

On the beams, mark a line 2″ in from either end and 1/2″ down either side. Place a leg against the line and mark its thickness. Transfer that line as well. Set the square for 1/2″ and connect all of the pairs of lines.

Saw

With hand saw, cut on the inside of each shoulder line down to the 1/2″ line. To be safe, stay a little further inside the lines. Make extra relief cuts on joints with a flat area wider than 1″ to make chiseling out the waste easier and help keep the bottom flat.

Chisel

Start removing wood from the joint with a sharp chisel and hammer. Work at an angle removing about 1/8″ at a time to create a slope to the other side.

When you get near the line, flip the piece over and chop from the other side until you reach that line.

Carefully shave away the rest using lighter paring cuts until the bottom is flat.

Work from both sides and check the bottom for square when you are done.

Chisel (continued)

Letter or number each leg to a corresponding joint on the beams.

Working one joint at a time, trim one side right to the line, but don’t trim the line away. This is called “saving the line.”

Hold the end of the corresponding leg in place and check the layout line. If it doesn’t match up, redraw it. Trim to the line then repeat the process on the other half of the joint.

When both halves of the cut are done, fit them together. The fit should be snug, requiring no more than a few light hammer taps to seat it.

Make 'Em Pretty

Functionally, the horse is done, but take it a step further and design them.

You can begin by making a pattern on a piece of card stock and then transferring it to both sides of each leg. You can use a regular handsaw to get rid of the waste and then chisel away the rest.

Make 'Em Pretty (continued)

Staying back from the pattern lines, saw out a notch to remove the bulk between the curves.

Now make a cut across the points.

Make 'Em Pretty (continued)

Using a sharp chisel, trim along the edges at an angle to the pattern lines.

When both sides are trimmed, pare away the wood in-between, leaving just a bit of the angled edge intact.

Clamping the leg to a bench is highly recommended. Be patient and take light shavings.

Make 'Em Pretty (continued)

Make a relief in the bottom of each leg to create feet. Measure 2″ in from each end and about 1/4″ deep.

Using the same method as the half-laps, saw to the lines and chisel away the rest.

Make 'Em Pretty (continued)

Use a chisel (or knife or sandpaper) to remove all of the sharp corners.

Avoid the areas near the joints.

The Glue-Up

Apply some glue to all of the joint surfaces and put them together.

Place them on a flat surface with weight on them while they dry. If your joints are a little loose, you can use epoxy or some other gap filling glue. Foaming, polyurethane glues, like Gorilla glue, work well.

For even more strength, use a 3/8″ diameter 4″ deep dowel through the bottom of each foot.

The Glue-Up (continued)

Sand them smooth and apply finish. You can use double stick tape to add a strip of cedar to the top of the horses to protect them, and whatever you place on them, from damage.

And there you have it! All that’s left now is to put them to use. And this relatively simple project makes a great present for a woodworking friend.