M33_Panolele_Opener1696

I love making my own musical instruments. Nothing beats the feeling of playing your own tunes on an instrument you made yourself. While the best instruments are made by skilled craftspeople with high-quality materials, it can be very rewarding to craft an instrument with simple components at hand.

A few years ago I got interested in the idea of making my own cigar box ukulele. I had a nice box and the wood to make the neck but I needed a lot of other parts, like frets and a slotted fretboard and tuners and strings, that I had to order and wait for them to arrive. But I wanted it done right then! So while I waited, I thought about how those parts functioned and what I could substitute.

I remembered someone using toothpicks for frets on cigar box guitars, and while I was wary of steel strings cutting into the wooden frets, I thought a ukulele’s nylon strings should be fine. Toothpicks for frets: check.

I’d also seen a lot of instruments built with cookie tins for the body, so I headed to the local resale shop to look for one. No tins, but what I did find was even better. Nice, rigid aluminum cake pans, in two sizes. “Resophonic instruments use aluminum cones, don’t they?” I thought. Cake pans for the body: check.

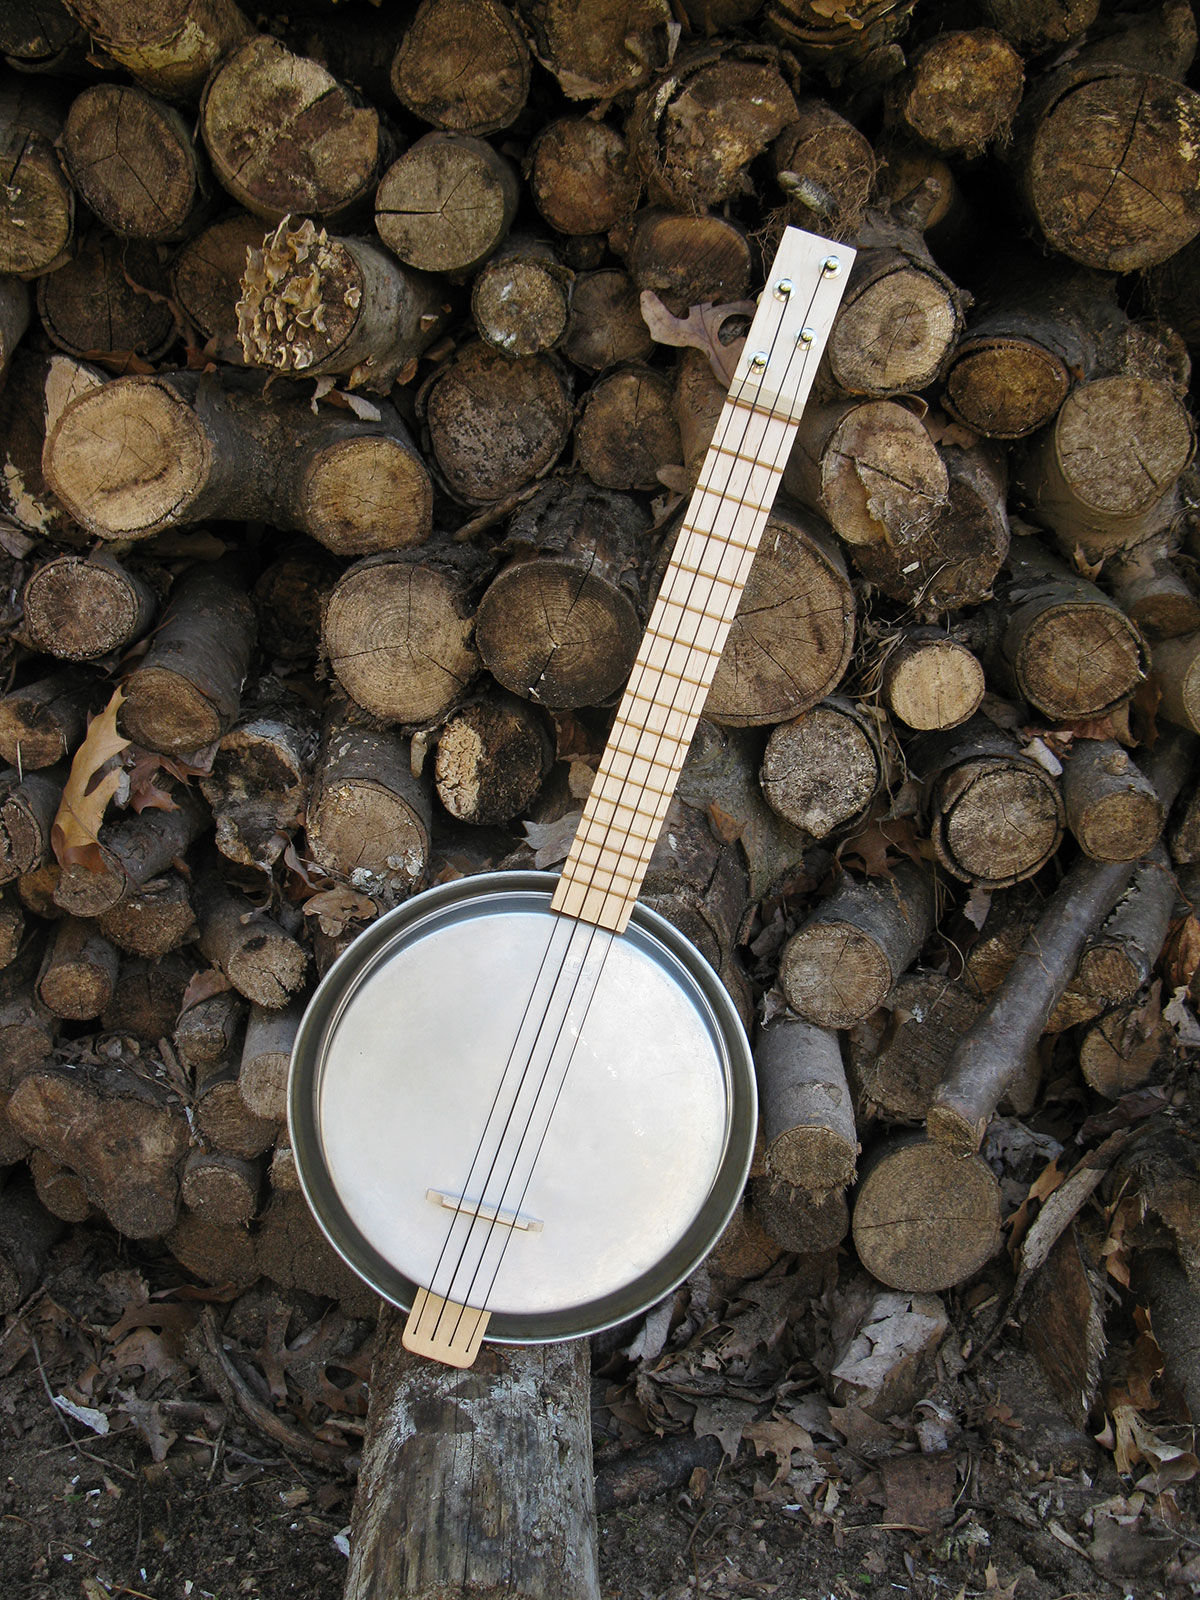
I brought my treasures home and found a nice piece of hardwood for the neck. Luckily, I had a set of tuners and strings on hand. I got to work and a few days later, I had a cake pan uke!

The name? Early in ukulele history, Alvin D. Keech introduced a banjo ukulele that eventually got the name banjolele. Looking like it does, it seemed natural to call my instrument a Cake Pan-jolele, or Panjolele for short.

Materials

From a hardware store:

  • Hardwood lumber, 1×2 nominal, 36″ length Actual size is ¾”×1½”. Choose oak, maple, poplar, or other hardwood, as straight and as knot-free as possible.
  • Wood screws, #6×1¼”, Phillips head (3)
  • Wood glue
  • Spray lacquer or polyurethane, clear (1 can)
  • Sheet metal screw, 2″, pan head

From a resale shop or department store:

  • Cake pans, aluminum or steel, 2″ deep: 9″ diameter (1) and 8″ diameter (1) — Cake pans have sides at right angles to the bottom, and are deeper than pie pans. Steel is OK, but rigid aluminum pans are easier to cut and have a better sound.

From a music store:

  • Ukulele friction tuners (set of 4) — I’m using a basic $13 set, item #UP26 from Elderly Instruments (elderly.com), but for just $15 you can get better quality tuners, Elderly #GUKNW.
  • Ukulele strings, concert scale length (set of 4) — I’m using a basic $3 set of Hilo black nylon strings, Elderly #HCU. For $5, Aquila’s Nylgut set, Elderly #ANCR, has the sound of old-fashioned gut strings.

From a grocery store:

  • Square wooden toothpicks (20) — You can also get these from Lego Education (legoeducation.us), item #W751742.

Tools

  • Pencil
  • Ruler with e” marks
  • Marking pen, fine tip
  • Square, adjustable
  • Handsaw or power miter saw
  • Sanding block and sandpaper — in various grits
  • Drill or drill press
  • Drill bits: 5″, 1″, 6″, 2″, and #6 countersinking bit
  • Screwdriver, Phillips head
  • Spring clamps (2 or more)
  • Hacksaw with fine-tooth blade
  • Rotary tool with cut-off wheel — such as a Dremel
  • Needle files including a triangular file
  • Rasp or Surform plane/rasp
  • Flush nippers, end cutters, toenail clippers, or a utility knife

Make Amends

In Step 2b of the print version, Step 4 of the online version, the two holes are shown 1¼” away from the end of the brace. This puts them a little too close to the end of the neck. Author Chester Winowiecki recommends changing that dimension to 1″ or 1-1/8″.

On page 83 (print; online Step 9) we advised readers to draw a chord and its perpendicular three times to find the center of a circle. It’s only necessary to draw two such perpendiculars; their intersection will mark the center. Thanks to reader Michael Nachtigal of Wesley Chapel, Fla., for the fix!

MAKE Volume 33 features our special Software for Makers section covering apps for circuit board design, 3D design and printing, microcontrollers, and programming for kids. Also, meet our new Arduino-powered Rovera robot and get started with Raspberry Pi. As usual, you’ll also find fascinating makers inside, like the maniacs on our cover, the hackers behind the popular Power Racing Series events at Maker Faire.

Try your hand at 22 great DIY projects, like the Optical Tremolo guitar effects box, "Panjolele" cake-pan ukelele, Wii Nunchuk Mouse, CNC joinery tricks, treat-dispensing cat scratching post, laser-cut flexing wooden books, sake brewing, growing incredibly hot “ghost chili” peppers, and much more.

On newsstands now, by subscription, or available in the Maker Shed

Buy now!

Project Steps

Prepare the neck and brace.

Using a power or hand miter saw, cut 2 lengths from the 1×2 board: 13-3/4″ for the neck and 10-1/2″ for the brace. Save the leftover piece for other parts.

Decide which side will be the fretted (top) side of the neck, and use a sanding block to sand it flat and smooth. Start with coarser grits and work up to finer grits.

At one end of the topside of the neck, mark out the cutout as shown. This is the Panjolele’s headstock.

Carefully cut away the wood from this area using a handsaw and then sand away any saw marks.

Mark out the placement of the tuner holes as shown. Drill the holes all the way through the headstock using a 3/16″ drill bit.

Following the same holes, drill down 1/8″ from the top

of the headstock with a 3/8″ bit. Test the fit with one of

the tuners.

TIP: Mark the bit with a piece of tape to help you stop at the right depth.

NOTE: These hole dimensions fit the UP26 tuners. Adjust if necessary to fit your tuner’s shaft and bushing.

Attach the neck to the brace.

Mark out the areas where the neck and brace will join. Draw a line on the bottom of the neck 1-1/2″ from the uncut end. Make a similar mark 1-1/2″ from one end of the brace. This is now the top of the brace.

On the bottom of the brace at this same end, mark out the 3 holes as shown.

Drill the holes all the way through with a #6 screw countersinking bit.

TIP: Alternately, use a bit slightly larger than the unthreaded part of the screw’s shaft, then use a larger bit to countersink the top of the hole.

Leaving one hole uncovered, clamp the neck and the brace together on a workbench with the 2 marked areas facing each other and each edge squared up to the marked lines.

Using the hole as a guide, use the #6 bit to drill ½” into the neck on the centerline, fret side down, being careful not to drill all the way through.

Install a #6 wood screw into this hole and tighten well.

Remove the clamp, recheck the alignment of the 2 pieces, and drill the other 2 holes. Install the remaining

wood screws to check for fit, then remove all the screws.

At the other end of the brace, mark out the string holes as shown in the diagram. Using a 1/16″ bit, drill the holes all the way through the brace.

Measure 5″ from this same end, and drill a 1/8″ hole through the brace, centered from side to side.

Lay out and glue the frets

Using a pencil, mark a line on the topside of the neck 3-7/8″ from the headstock end. This is where you’ll glue

the nut.

Starting from this line, mark out the placement of each fret as shown in the chart.

NOTE: Double-check your measurements and be sure the lines are square to one edge.

With a very small amount of wood glue, glue one toothpick at the headstock side of each line, and clamp carefully with a pair of spring clamps. Allow the glue to set for a couple of minutes, remove the clamps, and carefully wipe away any excess glue with a damp rag.

Set aside to completely dry overnight.

TIP: To keep your fingers away from freshly glued frets and do the job faster, stagger the gluing order: #1, #7, #2, #8, #3, #9, etc.

Prepare the cake pans.

On the back of the 9″ cake pan, mark the center and drill a 3/16″ hole.

On the back of the 8″ cake pan, mark the center and draw a line through it, from edge to edge. Draw parallel lines ¾” on either side of this centerline.

To find the center of a circle: Draw a line across the circle, near the edge. Measure that line and divide it in half, then use your adjustable square to draw a second line from the midpoint, perpendicular to the first. Do this 1 more time (2 to be sure). The 2 perpendicular lines will intersect in the center of the circle.

Transfer the parallel lines down each side.

Between these lines, mark a base line on each side 1/2″ from the back of the pan, using the adjustable square.

Using a hacksaw, cut a notch in the side of the pan along the parallel lines, from the rolled top edge to your base line.

Cut along the base line with the rotary tool’s cutoff wheel. (You might also be able to score, bend, and snap the piece off.)

Repeat on the other end of the pan.

File away any burrs and test-fit the brace into the notches. If necessary, file enough metal away for the brace to fit.

Sand the frets

Using a saw, pair of flush nippers, end cutters, toenail clippers, or utility knife, carefully trim the ends off of the toothpicks.

TIP: If you use a saw like I did, clamp the toothpicks and cut downward to avoid pulling off the frets.

With medium-grit sand-paper and a sanding block, sand the edges of the toothpicks flush with the edges of the neck. You can also sand the ends of the frets at a 45° angle.

With fine sandpaper and a block, sand the tops of the frets so that they’re all level.

Sand the top edges of each fret to make them nice and round.

CAUTION: Don’t sand too much,

as this will change the maximum height of the fret.

Finish the neck and brace.

Using a rasp or Surform tool, ease over the corners of the neck, and round the back.

NOTE: Stay about 1/2″ away from the headstock area and the area that will be screwed to the brace.

From the leftover parts of the 1×2 (or other hardwood scrap), cut the nut and bridge pieces as shown. File the notches with a triangular file.

Glue the nut on the nut line on the fretboard side of the neck, the same way you glued the frets.

Set the bridge aside; you’ll use it in the final assembly.

Sand the entire neck smooth, removing all pencil lines and tool marks. Sand the brace.

Attach the neck and brace with the 3 wood screws.

Finish the entire neck/brace assembly and the bridge with spray lacquer or polyurethane and allow to dry completely.

Final assembly.

Press-fit the bushings into the front of the headstock and install the tuners.

Put the 8″ cake pan over the brace, taking care not to scrape the wood finish.

Tie a knot in the end of each ukulele string and thread them through the holes in the end of the brace. Check the diagram to get the placement just right.

Thread the strings through the holes in the tuners and knot them. Turn the tuners to tighten the strings.

Attach the 9″ cake pan to the back of the brace with the 2″ pan head screw.

Put the bridge under the strings and move it 15-5/8″ away from the nut. (The extra 1/8″ compensates for any string stretch.)

Final adjustments, tuning, and playing

Tuning up: Tune up your ukulele with an electronic or online tuner, tuning the strings G-C-E-A (most popular) or A-D-F#-B. Ukulele strings take a long time to stop stretching, so you’ll need to keep retuning for a couple days, but it’s good practice! If the tuners turn back after you let them go, tighten the screw at the end of the tuner.

Fine-tuning the action: If the strings feel really hard to push down to the frets, you can lower the “action” at the nut and the bridge. The bottom of the strings should be about 1/32″ from the top of the first fret and 3/32″ from the top of the twelfth fret. Deepen the notches in the nut first and then sand the bottom of the bridge. Do a little at a time, and check frequently so you don’t overdo it. If you find that the strings pop out of the nut or bridge, use a precision knife to cut deeper slots.

Playing tunes: Here are few chords to get you started. For right-handers: use the fingers of your left hand to press the strings down to the frets in the spots shown in the diagrams. The numbers under each string show which finger to use. Strum all 4 strings with the first finger or thumb of your right hand. Lefties: reverse!

Going further: Use this same method to make instruments with longer scale lengths, more or fewer strings, metal frets and steel strings, or different sound boxes. One of my favorite instruments right now is a tenor banjo with 4 steel strings, metal frets, a 21″ scale, and a cake-pan soundboard and resonator.