Make: Projects

Notifying Doorbell with PushingBox

Use an Arduino and an optional IP camera to build a doorbell that sends you a Push notification on your phone and an email with a picture of the person at the door.

  • By Clement Storck
  • Category: Arduino
  • Time Required: 1 hour
  • Difficulty: Moderate
Notifying Doorbell with PushingBox

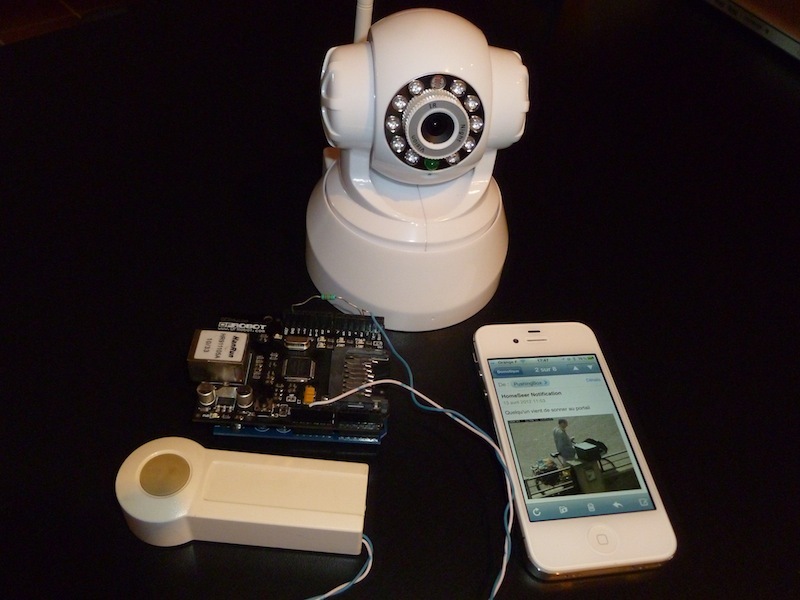
This project will help you to hack your doorbell to send Push notification and an email with an attached picture when somebody’s at the door. It use the free PushingBox service to delegate all the programming part and make things easy.

Steps

Step #1:

Next
Notifying Doorbell with PushingBox
  • How does it work ?
  • 1. When the doorbell is pushed, the Arduino sends an HTTP request to the PushingBox API.
  • 2. PushingBox launches the user's scenario and gets a picture from the web camera.
  • 3. PushingBox sends a Push notification to the user's phone and a mail message with the picture attached.

Step #2:

Next
Notifying Doorbell with PushingBox
  • Prepare your material. You need:
  • An Arduino + Ethernet Shield
  • A Doorbell
  • A soldering iron
  • A 10K resistor
  • A web camera (optional)

Step #3:

Next
Notifying Doorbell with PushingBoxNotifying Doorbell with PushingBoxNotifying Doorbell with PushingBoxNotifying Doorbell with PushingBox
  • Open your doorbell.
  • Solder wires to the button's terminals.
  • Close the doorbell.

Step #4:

Next
Notifying Doorbell with PushingBox
  • Plug the wires into the Arduino.
  • One wire on the 5v pin;
  • One wire on the 3rd input pin;
  • The 10K resistor between GND and the 3rd pin.

Step #5:

Next
Notifying Doorbell with PushingBox
  • Test the connectivity with a simple Arduino program.

Step #6:

Next
Notifying Doorbell with PushingBox
  • The hardware part is finished. Let's define the way you will be notified.
  • Go to http://www.pushingbox.com.
  • Login with your Google account.
  • Go to the My Services page.
  • Click on Add a service.

Step #7:

Next
Notifying Doorbell with PushingBoxNotifying Doorbell with PushingBoxNotifying Doorbell with PushingBox
  • Click on the service by which you want be notified.
  • Use Prowl or Pushme.to for iPhone Push notification;
  • Notifry for Android Push notification;
  • Toasty for Windows Phone Push notification.
  • Enter the name of your new service and fill in the API that this application gave you when you installed it.
  • Click Submit.

Step #8:

Next
Notifying Doorbell with PushingBoxNotifying Doorbell with PushingBoxNotifying Doorbell with PushingBox
  • Now, go to the My Scenarios page.
  • Create a scenario called "Somebody's at the door".
  • Click on Create scenario.
  • Click on Add an Action.

Step #9:

Next
Notifying Doorbell with PushingBoxNotifying Doorbell with PushingBoxNotifying Doorbell with PushingBoxNotifying Doorbell with PushingBox
  • First, add an action using the Email Service.
  • Fill in the mail Subject and the Body.
  • The third field is optional and is for attaching a shot from your IP camera to the email. Fill in the URL (publicly reachable) of your web camera. The camera's output must be a picture less than 100KB in size.
  • Do the same with your Push notification service and click the Back button.

Step #10:

Next
Notifying Doorbell with PushingBox
  • Your scenario is now created.
  • Click on "Test" to test the scenario.
  • You should receive a Push notification on your phone and an email.
  • Make a note of the "DeviceID" value of this scenario. You will paste it into the Arduino code.

Step #11:

Notifying Doorbell with PushingBox
  • Download the Arduino source code from the PushingBox API page and open it.
  • In the #define DEVID1 line, paste the DeviceID of your scenario. Make sure you enclose it in quotes as shown.
  • Compile the code and program your Arduino.
  • You're done! Test it, install it on your door and enjoy! :)

11 Responses to Notifying Doorbell with PushingBox

  1. Jake McMillian on said:

    The Arduino Uno should work great for this job: http://amzn.to/ItkkQT
    You’ll also need an Arduino Ethernet Shield: http://amzn.to/JZxI1a
    And an Internet-enabled webcam: http://amzn.to/JZxKWU

  2. Goli Mohammadi on said:

    We also have a great selection at the Maker Shed: http://www.makershed.com/SearchResults.asp?Search=arduino&Submit=Search

  3. Eric Koelle on said:

    *Update* – Figured it out. This is how you do it using a Foscam camera:

    http://URL:PORT/snapshot.cgi?user=USERNAME&pwd=PASSWORD

    Just replace the URL, PORT, USERNAME and PASSWORD with your own and you should be good to go.

  4. Brian Isenstein on said:

    Looks like it’d still ring the bell, as they didn’t disconnect any part of the doorbell circuit. Just added the 2 wires to read if the button is open (not pressed) or closed (pressed).

  5. Jay Bryon on said:

    For a wireless doorbell, it’s pretty much that simple, but if you’re old-school with a wired doorbell and transformer off house current, you’ll want to check voltage first. You could get away with just reading the terminals with the Arduino, but if there’s a common ground between the Arduino and the doorbell, you might get excessive voltage to the board and let out the magic smoke, so to speak. This is where I’d opto-isolate it, something as simple as a voltage-appropriate bulb facing a cds, in a tube of black heat-shrink or electrical tape, with the CDS (photoresistor) read by the Arduino. But that’s just one approach.

  6. Look for a WiFly shield or similar (not to advertise, but they sell it on SparkFun [only place I know of that sells one])

  7. Bader Rashed on said:

    same my Question is it Ethernet or WiFi or Bluetooth to the adurino which is attached to the doorbell?

  8. Tommy Inglis on said:

    I bought the camera here http://amzn.to/JZxKWU and was curious if you could offer any insight into discovering the URL?

  9. Hi Brian, i would like to talk to you about ARM, cose like you im also trying to use it instead of a micro, and have problems. btw how did you develop the knocking sensor, and what language did you use?

  10. Loved this user guide, one of the best I have come across! With that being said, I am confused about one aspect of this.
    Not sure why Prowl and Notify My Android (NMA) are being used in this process. These apps are completely unnecessary and complicate this process. PushingBox allows you to send emails directly to ANY email account and twitter (tested this and it works). Most people have email/twitter notification already on their phones so not sure why anyone would need a specialized notification app. Not only that, but the PushingBox Email service allows you to send a photo where Prowl and NMA do not. Also checked the user reviews for NMA and there are known issues with notifications not showing up (experienced this myself on one occasion). Whereas I have never had notification problems with my email. Simplify, simplify; best to use apps and services which are highly reliable and the user is already familiar with whenever possible.

Leave a Reply

Fill in your details below or click an icon to log in:

WordPress.com Logo

You are commenting using your WordPress.com account. Log Out / Change )

Twitter picture

You are commenting using your Twitter account. Log Out / Change )

Facebook photo

You are commenting using your Facebook account. Log Out / Change )

Connecting to %s

%d bloggers like this: