Make: Projects
The Drill Rod
Run a mini electric “punk bike” faster (and funnier) by powering it with a big, bad cordless drill.
I have a 25′ cruising tugboat in Florida, and I wanted a small, lightweight ride that I could keep onboard for making beer and ice runs when I pull into a marina. After seeing a short segment on TV about a cordless-drill-powered bike at a hardware convention, I decided to build my own.
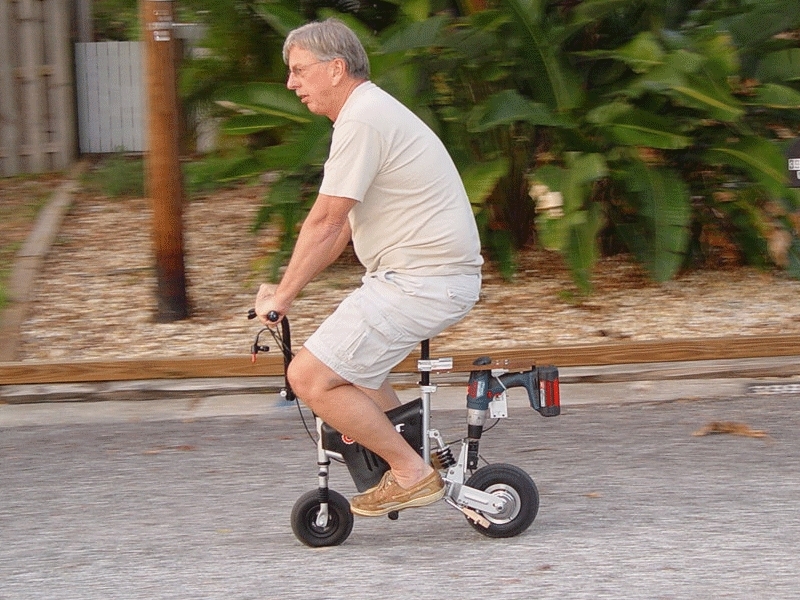
Behold the result: the Drill Rod. Equipped with a 36-volt drill, this brute accelerates from 0 to 10mph in just 2 seconds and is responsive enough to do tricks like standing on its back wheel.
As for styling, it’s been said that when I’m on my Drill Rod, I look like a circus bear on a tricycle (duly note the photo in Step 1). You will not attract potential romantic partners when riding this. Trust me.
When I started the project, I contacted the company that made the bike I saw on TV and asked if they could just sell me the right-angle gearbox that enables the center-mounted drill to drive the rear wheel. But they refused; they would only sell a finished bike.
I continued looking for ways to build my own. At a flea market, I found a tiny battery-powered bike for kids called the Electric Punk, made by Razor. I bought it for $60 and took it home. With its small battery and motor, I knew it was underpowered for what I needed, and its 7" rear wheel looked too small to support the weight of an adult.
On flat pavement, the Electric-Punk only went 5mph, and it couldn’t even pull me up my driveway slope. But its small frame was perfect for the project.
For the engine, I used a 36V Bosch Litheon drill, which was the most powerful cordless I could find. I bought it reconditioned through Amazon for $219. I also found a nice, small right-angle gearbox (1:1 ratio) made by Torque Transmission, model #RAB-1, which was rated at 1/3HP at the drill’s maximum speed of 1,800rpm.
Steps
Step #1: Beef up the rear wheel.
Next


- I took the Electric Punk apart and went to work. I stripped the plastic shells, the battery, the motor, and the motor thumb trigger on the right handlebar. I threw the useless little motor in the trash.
- First I replaced the 7" rear wheel with a larger rear wheel and sprocket assembly for the Razor Mini Chopper, which takes a 9" tire. This would carry weight more comfortably. I don’t know if this was strictly necessary, but I knew I wanted it to make the bike look cooler.
Conclusion
So how does it handle? I have cruised with the Drill Rod several miles so far, and it works just fine. Several friends have also tried it, and it always puts a big smile on their faces. I like to think this is because they’re having fun, but perhaps embarrassment is involved. My son and son-in-law also both love riding the Drill Rod. Like me, they have no shame.
One day I was cutting tree limbs hanging over a fence on my property, and a limb fell onto the neighbor’s side of the fence. The way our homes are configured, I had to go halfway around the block to get to where I could pick up the limb, and I decided to ride the Drill Rod. On the way back home, I passed a city maintenance truck. The guy inside just stared and shook his head as if to say, “You know that people can see you, don’t you?”
The Drill Rod weighs 37lbs, including the weight of an extra battery, which fits easily in the frame where the original battery pack went. The little bike takes me 2 miles per fully charged battery. If you carry extra batteries, you increase your range 2 miles per battery. I did the math.
Admittedly, the brakes that come on the E-Punk are terrible, and are inadequate for the Drill Rod. But between using the brakes and dragging your feet, you can get stopped. That being said, if you build one and run it into a tree, consider yourself forewarned.
Meanwhile, I’m thinking about building a drill-powered dinghy.
This project first appeared in MAKE Volume 21.


Amalepoet, that sounds amazing! Please do keep us posted on the development of your build. Better yet, if you’re feeling up to it, document it and share it here on Make: Projects. I’m sure there are others in the community who could benefit from it.