In early 2011 my robot club, the Dallas Personal Robotics Group, was looking for a way to help our beginning members build up their skills. To this end, we produced a series of lessons covering 5 topics needed to make a simple, programmable robot: making PCBs with the toner transfer method, programming ATtiny microprocessors, laying out circuit boards using KiCAD, using Inkscape to design robot parts, and programming state machines. Videos of these lectures are available on DPRG’s website.
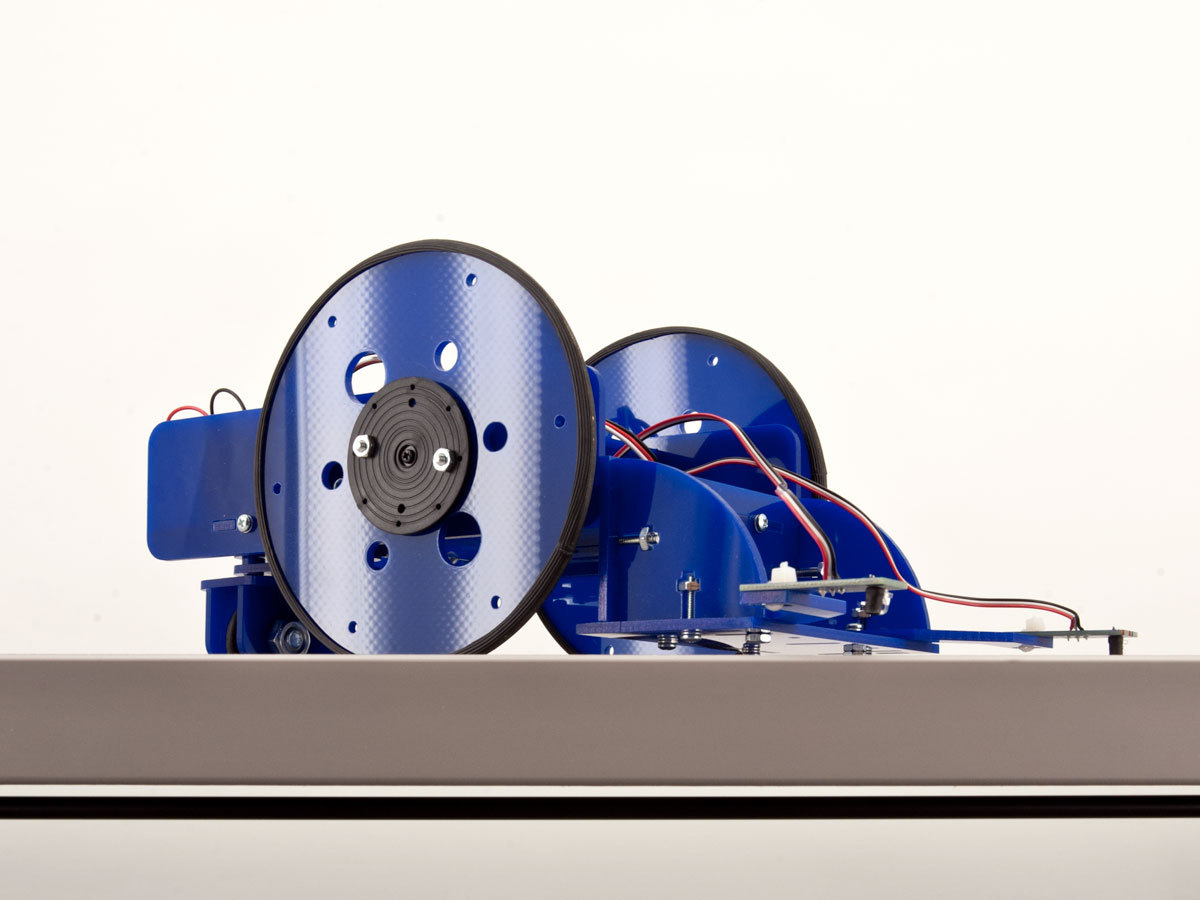
The Tiny Wanderer is the starter DIY robot model we designed to support the series. It uses the unintimidating ATtiny85 chip, which is less complex than larger chips, and the new kit version shown here lets you easily swap in an Arduino.
The chassis, inspired by the now-discontinued Oomlout SERB, has benefited from constant modification and tweaks by DPRG members. Its two IR LED/sensor proximity “feelers” were originally designed to let the bot wander around a tabletop without falling off, but they can be repurposed for obstacle avoidance and line-following. (Another successful mod added 64-slot encoders on the wheels, for dead reckoning.)
SVG and PDF cutout templates
- Download the templates zip file.
Download the Code
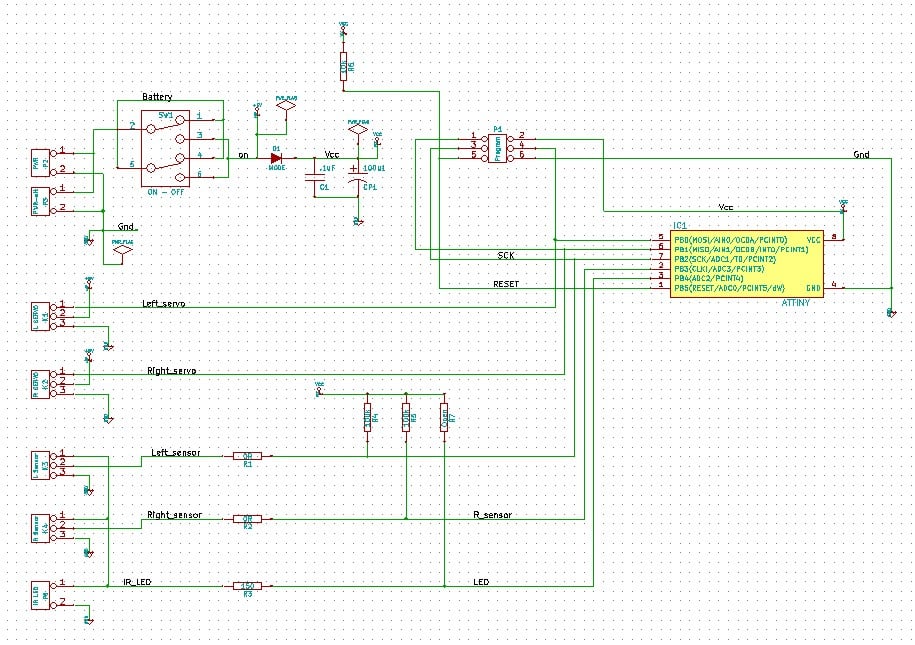
Circuit Board Layout files
Wiring Check Tables
Before inserting the ATTiny85 into the socket on the controller board you should make some simple ohm meter checks using these tables.
Here are some additional mods that give Tiny completely different personalities:
- Navigate around via bump sensor in front: Bump Sensor for the Tiny Wanderer
- Light-seeking "Moth" (or light-avoiding): Tiny Wanderer "Moth"
I hope the fun we’ve had with Tiny Wanderer will be shared with other hobby roboticists and makers around the world.
Steps
Step #1: Build the Chassis.
Next


- Peel the protective plastic off all acrylic parts. Insert the rubber grommets packaged with the servos into the 4 servo mounting holes. Use four #4×3/8" screws to attach each servo to one of the 2 acrylic side pieces, with the shaft aligned with and on the same side as the etched guideline. With the motors installed, align the side pieces next to each other and make sure they match up.
- See http://makeprojects.com/v/29 for more photos identifying all the acrylic kit pieces.
- Fit the 2 acrylic axle holders into the bottom of the truck piece. Anchor each one with a nut in its cross-shaped cutout, screwed onto a #4 screw threaded through a washer from the top of the truck.
Conclusion
Backup Plan
Because Tiny Wanderer has no rear-facing sensor, it might back off a cliff. Strategies for preventing this are a current “area of research” at the DPRG. In the code you downloaded, the robot backs up while turning away from the detected edge, for about 1 second (about 90°). Then it resumes rolling forward. If both sensors find a cliff at the same time (very rare), it backs up straight. Wheel speeds and backup time parameters are easily tweakable in the code’s .h file.
You can also change the robot’s behavior by moving one sensor slightly ahead of the other. Tell Tiny to turn slightly toward the leading sensor when it detects a cliff, then turn sharply when the trailing sensor finds it. That way, Tiny will do a multi-point turn and then pivot to run along the cliff!
Yet another approach is to stop the cliff-side wheel entirely and inch the other wheel forward until both sensors detect the cliff — then back up and turn 180°.
Sensor Mods and Arduino Upgrade
You can reconfigure the Tiny Wanderer sensors to face forward, for object avoidance, or run close together, for line following.
We designed the Tiny Wanderer as a hackable platform. One possible modification is to add paper encoder disks (black/white stripes) inside the wheels, and use the IR sensors to track servo speed and perform dead reckoning calculations. And of course, you can also use different types of sensors, such as light, sound, or distance.
For a major upgrade of capabilities, the Tiny Wanderer’s deck has mounting holes that fit a standard Arduino board, which has enough I/O pins to support all of the above — not to mention various plug-in shields with amazing capabilities. (I expect many Arduino-heads to be mainly interested in the Tiny Wanderer as an Arduino-scale rolling platform, and dispense with the whole ATtiny brain.)
If you’re ever in Dallas, the DPRG meets every Tuesday night and every second Saturday of the month. Come visit!
This project first appeared in MAKE Volume 29, pages 88–99.


